Advanced Exercises
Advanced Exercises
These movements require enhanced breath control, coordination, flexibility, stability, raw strength, and absolute power.
A strong foundation in basic and intermediate exercises is a prerequisite. Special attention must be paid to mechanics, alignment, and breathing.
Exercise Overview
Bottoms-Up Series
Double Alternating
Double Jerk & Clean & Jerk
Squat Method Get-Up
Chair Press
Overhead Squat
Bottoms-Up Clean
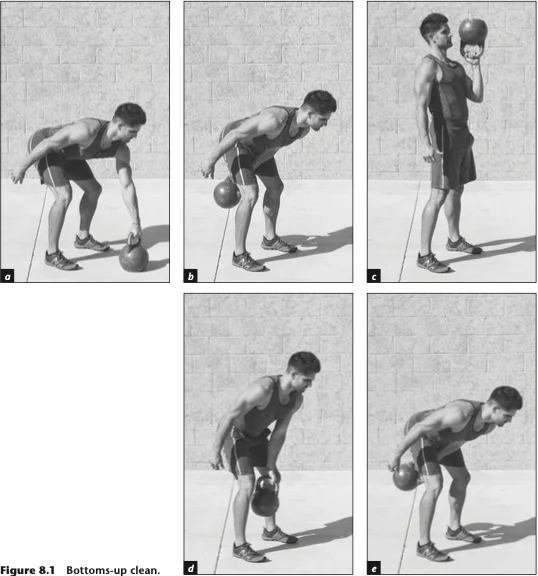
Figure 8.1 Bottoms-up clean.
The bottoms-up clean is the same as the conventional clean in terms of the hip and knee mechanics. However, the final position is different—instead of the kettlebell resting against the forearm, it is held statically with the bottom facing up. This necessitates a higher level of mental focus and dramatically works the grip and core muscles.
With a single kettlebell on the floor, sit back to load the hips and grab the handle with the finger-hook grip (see figure 8.1a). As with the one-arm clean, you swing the single kettlebell back through your legs to load your hips (see figure 8.1b) and then extend and pull the kettlebell up toward the chest (see figure 8.1c). Although a thumbs-back or thumbs-forward position can be used on the backswing, keeping the thumbs forward will create the smoothest transition to the bottoms-up position. Instead of inserting your hand into the handle, take a tight, crushing grip, squeezing the handle as tightly as you can to keep the bottom of the kettlebell facing up and prevent it from flipping. In addition to the intense grip, the kettlebell must remain vertically aligned over your feet with the forearm kept in a vertical plane in order to maintain the balanced position. While squeezing the grip tightly, also squeeze the abdominal and gluteal muscles, creating a full-body tension. To lower the kettlebell, let it fall and catch with the fingers as in a standard one-arm clean (see figure 8.1d), and follow the kettlebell down and back into a backswing (see figure 8.1e).
When performing this exercise, use the paradoxical breathing method to create extra tension in your core. Inhale as you swing the kettlebell through your legs, and exhale as the kettlebell reaches the top position as you squeeze your muscles to control it in the bottoms-up position; inhale again as the kettlebell swings back down.
Key Principles
- While executing the other parts of the movement (upswing and downswing), focus on being maximally relaxed while maintaining proper alignment.
- Use your free hand as a spotting tool to increase safety and avoid the bell falling into your face.
- The bottoms-up clean can be performed with single or double kettlebells, although the double bottoms-up clean requires greater coordination than the single version.
- If the kettlebell falls to one side or the other, quickly reposition your feet to the other side to prevent the falling kettlebell from colliding with your knee.
| common error | error correction |
|---|---|
| Inability to maintain the bottoms-up positioning of the kettlebell | Keep the elbow connected to the torso and tense the grip, core, buttocks, and lats to stabilize the entire body. Chalk the kettlebell and ensure your hand is placed in the center of the handle with the thumb forward on the backswing and upswing. |
| Maintaining a strong crush grip throughout the drop | Loosen the grip as the kettlebell drops into the backswing to allow the grip to recover before the next bottoms-up clean. |
| Allowing the arm and kettlebell to drift too far forward in the top position, causing loss of control | Keep the kettlebell, elbow, hip, and feet in vertical alignment. |
Bottoms-Up Press
Upon mastering the bottoms-up clean, you are ready to progress to the bottoms-up press. As with the bottoms-up clean, this positioning challenges the grip and overall body linkage while still activating the pressing muscles of the upper body.
Single Bottoms-Up Press
With a single kettlebell on the floor in front of you, grab the handle with a finger-lock grip and sit back to load the hips (see figure 8.2a). Clean the kettlebell to the bottoms-up position (see figure 8.2b). Maintain total-body tension and press the kettlebell directly up so that the load remains vertically aligned over your base of support (see figure 8.2c). The mechanics are identical to kettlebell press. Lower the kettlebell to chest level under control (see figure 8.2d). You can press repeatedly from the bottoms-up position or allow the kettlebell to swing down and reclean between each rep.

Figure 8.2 Single bottoms-up press.
Double Bottoms-Up Press
The double bottoms-up press is more challenging than the single variety, using twice the load and requiring more coordination to control and balance the kettlebells with both hands. With both kettlebells on the ground in front of you, grab the handles with finger-lock grips and sit back to load the hips (see figure 8.3a). Clean both kettlebells to the bottoms-up position (see figure 8.3b). Maintain total-body tension and press the kettlebells directly up so that the load remains vertically aligned over your base of support (see figure 8.3c). Lower the kettlebells to the clean position to complete each rep.
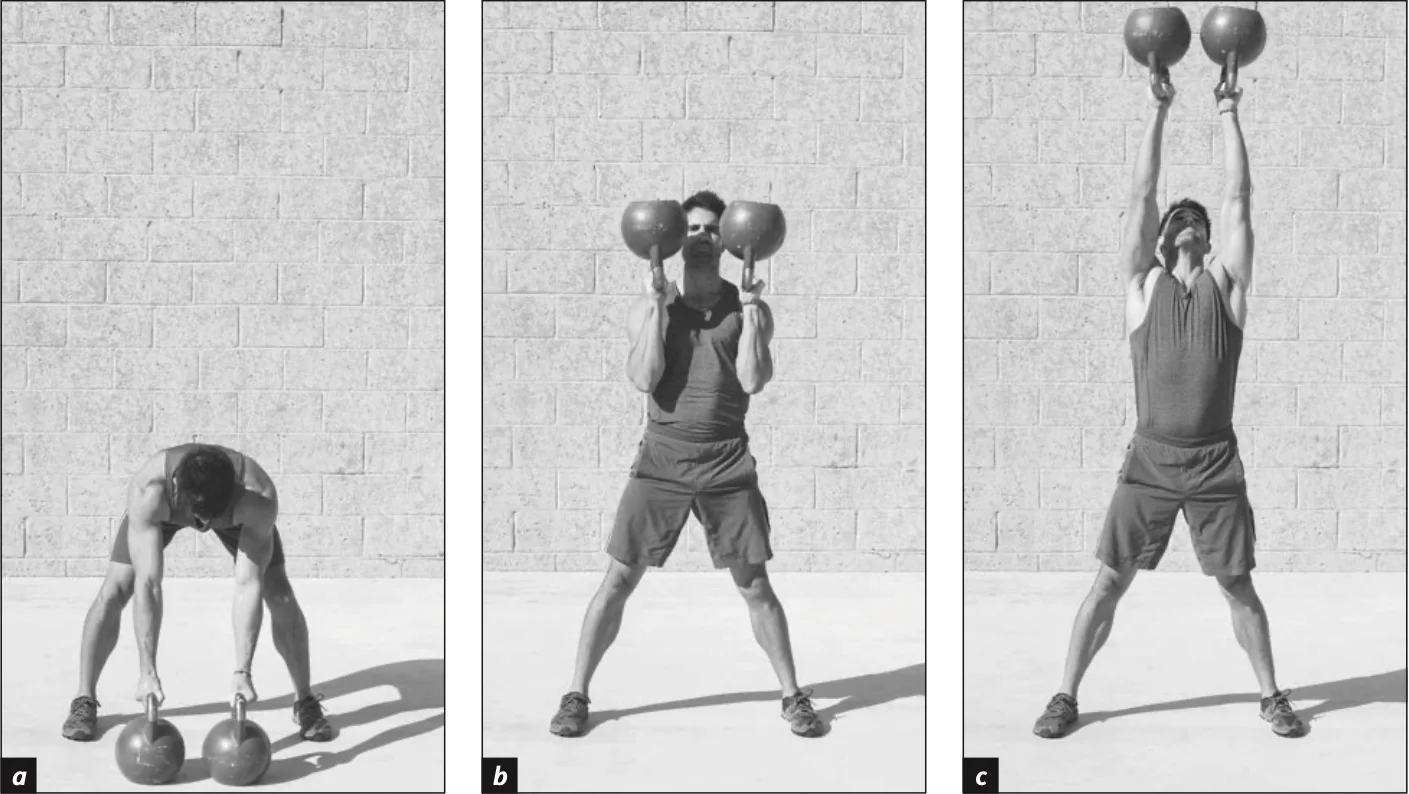
Figure 8.3 Double Bottoms-Up Press.
Alternating Bottoms-Up Press
The alternating bottoms-up press adds an additional coordination component to the double bottoms-up press. With both kettlebells on the ground in front of you, grab the handles with finger-lock grips and sit back to load the hips (see figure 8.4a). Clean both kettlebells to the bottoms-up position (see figure 8.4b). Maintain total-body tension and press one kettlebell directly up while maintaining the other kettlebell in the bottoms-up clean position (see figure 8.4c). Lower the kettlebell to the bottoms-up clean position while simultaneously pressing the other kettlebell to the top position (see figure 8.4d). On last rep, lower the top kettlebell before attempting to place the kettlebells on the floor.
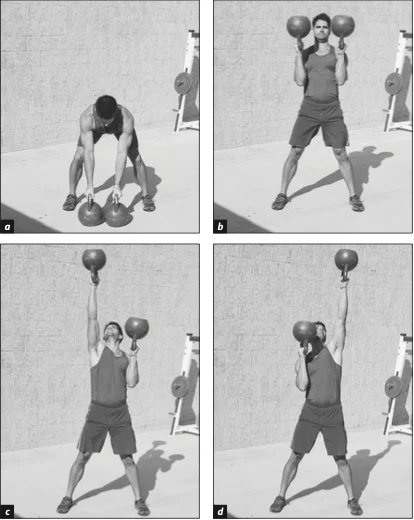
Figure 8.4 Alternating Bottoms-Up Press.
Key Principles
- As with the bottoms-up clean, when using a single kettlebell, it's important to spot the kettlebell with the free hand.
- When performing any of the double kettlebell variations, if the bells fall out of vertical position, step to the opposite side from the falling kettlebells to avoid collision.
| common error | error correction |
|---|---|
| Inability to maintain the bottoms-up positioning of the kettlebell | Keep the elbow connected to the torso and tense the grip, core, buttocks, and lats to stabilize the entire body. Also be sure to chalk the kettlebell and ensure your hand is placed in the center of the handle with the thumb forward on the backswing and upswing. |
| Pressing the kettlebells up with the body excessively deflected back and remaining in that position during lockout | After deflecting back to initiate the press, bring the body and head into vertical alignment. |
| Failing to manage the kettlebell falling from the bottoms-up position | Reposition your feet to one side or the other to prevent a falling kettlebell from smashing your knee or body. |
Double Alternating Clean
The double alternating clean is an advanced exercise that requires a high degree of body awareness, power, and coordination. There are two tempo-based variations for this exercise: two count and one count.
Two-Count Variation
For the two-count variation, start with both kettlebells on the floor in front of you, sit back to load the hips, and grip both handles with finger locks (see figure 8.5a). Clean one to the chest and let the other hang (see figure 8.5b). Next, let the top kettlebell drop (see figure 8.5c) and then clean the other kettlebell to the chest (see figure 8.5d). The timing of the two-count variation is the same as the one-arm clean except you alternate hands every rep. The greater challenge is that you will not be able to have much of a backswing and will have to pull the kettlebell up from a more static position, called the hang position, as shown in figure 7.13. This means you will not have the benefit of momentum the way you do in the one-arm or double clean and instead will have to use a more quad-dominant thrusting force to lift the bells. Because this is more of a dead start and requires greater effort to move the kettlebells, the double alternating clean is most commonly used as a power exercise, doing fewer reps and using challenging loads.
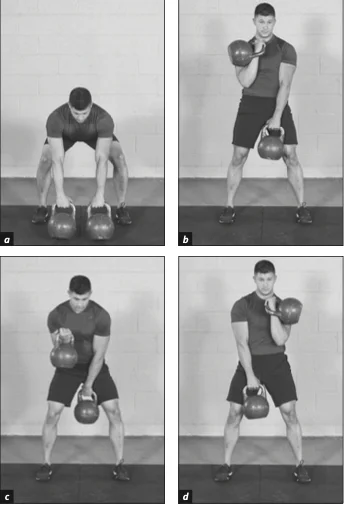
Figure 8.5 Double Alternating Clean: Two-Count Variation.
When performing the two-count double alternating clean, use anatomical breathing with three or more breathing cycles. One variation is to start from the rack position, inhale as you deflect back and drop the kettlebell into the downswing, exhale at the back of the downswing, inhale during the upswing and hand insertion, and exhale as the kettlebell lands in the rack position. Another variation is to start from the rack position, inhale as you deflect back and drop the kettlebell into the downswing, exhale at the back of the downswing, inhale, exhale as you begin hand insertion, inhale, and exhale as the kettlebell lands in the rack position. Recovery breaths can be taken in the rest position to allow for proper recovery and pacing.
One-Count Variation
The one-count variation is much more challenging and requires more precise timing and coordination. In the two-count variation, there is a natural pause as the kettlebell comes to rest in the rack position, so in effect you are still moving only one side of your body at a time. For the one-count variation, however, there is no stopping point and one side must pull as the other is pushing. The up and down is continuous throughout the set and you must sustain a rhythm to sustain the set. The key is to focus only on the pulling hand since you cannot have your attention on two things at one time. Once you start the pull with the right hand, the momentum carries it to the rack. In a standard clean, the legs straighten as the kettlebell comes to the rack. However, in this one-count variation, just as the right-hand kettlebell comes to the rack, you bend your legs and drop your center of mass, and as you let the right kettlebell fall into the drop, the left arm pulls and the legs bend as the left kettlebell comes to the rack. Continue this pattern throughout the set.
When performing the one-count double alternating clean, use paradoxical breathing with one breathing cycle due to the accelerated movement and tempo. Exhale as you lower one kettlebell and simultaneously bring the other up to the rack position. Inhale quickly in the rack position and repeat the sequence.
Key Principles
- For the two-count variation, use the pendulum spring mechanics in regard to hip and knee activity. For the one-count variation, it becomes necessary to use a squat-based mechanic due to the trajectory and fast-paced tempo.
- For the two-count variation, the trajectory of upswing and downswing is best described as the letter J. Thus, there is a circular component to the movement. For the one-count variation, the upswing and downswing follow a vertical groove (straight up and down). For the two-count variation, focus on both the cleaning arm and the arm that is not cleaning. For the latter, the primary goal is connectivity—keep the arm in contact with the torso.
- An important mechanic during the one-count variation is a drop to the squat position that initiates the motion for both kettlebells—the kettlebell that is descending and the kettlebell that is accelerating up.
| common error | error correction |
|---|---|
| Not deflecting back before dropping the kettlebell into the backswing for the two-count variation | Swing in front of an object (e.g., wall, mat) at arm's length; if you don't deflect back, you will hit the object. |
| Letting the noncleaning arm drift away from the torso in the two-count variation | Practice the movement without kettlebells, keeping your elbows glued to your body throughout the entire set. |
| Struggling with the timing of simultaneously pulling one kettlebell up as the other drops in the one-count variation | Bend your legs and drop your center of mass rapidly as you let the kettlebell fall into the drop. |
Double Snatch
The double snatch is one of the best exercises for increasing explosiveness, hip drive, and overhead stability. This exercise has two variations: the double half snatch (racking on the drop from overhead) and the double full snatch (no racking on the drop from overhead). Half snatch means to snatch the kettlebell or kettlebells overhead and then lower them to rack position before executing the downswing. Full snatch, or just snatch, means to snatch the kettlebells overhead and drop into the backswing from the top. The full snatch requires extensively more core stability, which is your stance. The bells fall a lot faster and more forcefully from the top. Therefore a natural progression for any double snatch is to first practice the double half snatch, and only progress to the double full snatch after you have full control over the movement.
Double Half Snatch
Start with both kettlebells on the floor in front of you. Sit back to load the hips and grip both handles with finger locks (see figure 8.6a). Swing the kettlebells back between your legs (see figure 8.6b) and then rapidly extend the knees and hips as you drive your body forward, with your forearms still connected to your body (see figure 8.6c). As the kettlebells swing forward and up, the kettlebells (and arms) pull away from your body. At this moment, shrug your trapezius muscles and pull with the arms, moving the kettlebells vertically up an imaginary chimney (see figure 8.6d). As the kettlebells are moving up, insert your hands into the kettlebells when they are between your neck and the top of your head. Proper overhead positioning is important for efficiency and thus work capacity. Your triceps are facing forward, thumbs are pointing back at a 45-degree angle, biceps are close to the ears, arms are vertical, and rib cage is open. From the overhead fixation position (see figure 8.6e), deflect the trunk backward and rise up onto the toes slightly as you let the kettlebells fall to the chest in the rack position (see figure 8.6f). From the rack, deflect the trunk again as you drop the kettlebells down and into the backswing to complete the rep. As with the double swing and double clean, various thumb positions can be used in the downswing and upswing portion of the double half snatch. The ideal is to turn the thumb back at the end of the downswing and transition to a 45-degree angle (thumb up) at the beginning of the acceleration pull.
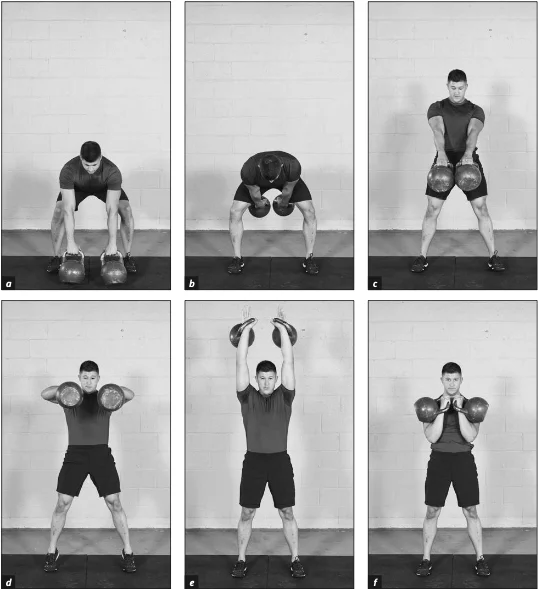
Figure 8.6 Double Half Snatch.
When performing this exercise, use anatomical breathing with three or four breathing cycles. One variation with three cycles is to start from the overhead position, inhale as you deflect back and drop the kettlebells, exhale as they land into the rack position, inhale as you drop from the rack, exhale at the back of the downswing, inhale as you upswing, and exhale on lockout. Another variation with four cycles is to start from the overhead position, inhale as you deflect back and drop the kettlebells, exhale as they land into the rack position, inhale as you drop from the rack, exhale at the back of the downswing, inhale, exhale as you begin the acceleration pull, inhale, and exhale on lockout.
Double Snatch
The double kettlebell snatch is more similar to a barbell snatch than it is to a one-arm kettlebell snatch. Use the double snatch for strength and power training, and keep the reps lower. This is because the shoulder girdle and torso can rotate and absorb force well in the one-arm snatch. With the double snatch, the range of motion is much more restricted for the shoulders, scapulae, and spine. It puts much more stress on the body to swing both arms overhead together with such force. This is not to scare you; it is simply to show you the forces involved and make sure you respect them. You can do the double snatch, but do not do bad reps. Keep them crisp and powerful and make sure that you have the fitness to be able to demand perfect form.
Start with both kettlebells on the floor in front of you. Sit back to load the hips and grip both handles with finger locks (see figure 8.7a). Swing the kettlebells back between your legs (see figure 8.7b), and then rapidly extend the knees and hips as you drive your body forward with your forearms still connected to your body (see figure 8.7c). As the kettlebells swing forward and up, the kettlebells (and arms) will pull away from your body. At this moment, shrug your traps and pull with your arms, moving the kettlebells vertically up an imaginary chimney (see figure 8.7 d and e). As the kettlebells are moving up vertically, insert your hands when the two kettlebells are between your neck and the top of your head. Alignment in overhead position is with triceps facing forward, thumbs pointing back at a 45-degree angle, biceps close to the ears, arms vertical, and rib cage open. Due to the extreme inertia of the double full snatch, it's critical to maintain deflection when dropping the kettlebell from the overhead position into the backswing. As you deflect the trunk backward, rise onto the toes slightly as you let the kettlebells fall (see figure 8.7f). When the triceps come into contact with the rib cage, sit back with the hips and keep your eyes on the kettlebells as they swing back behind you to complete the rep (see figure 8.7g). Failing to deflect or incorrectly time the hip crease could result in a loss of balance, injury, and so on. Pay extra attention to sitting back with the hips into the backswing. As with the double half snatch, various thumb positions can be used in the downswing and upswing.
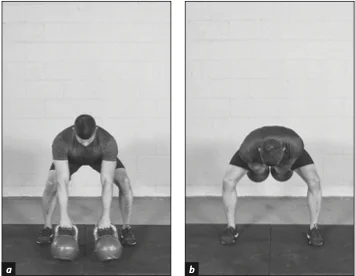
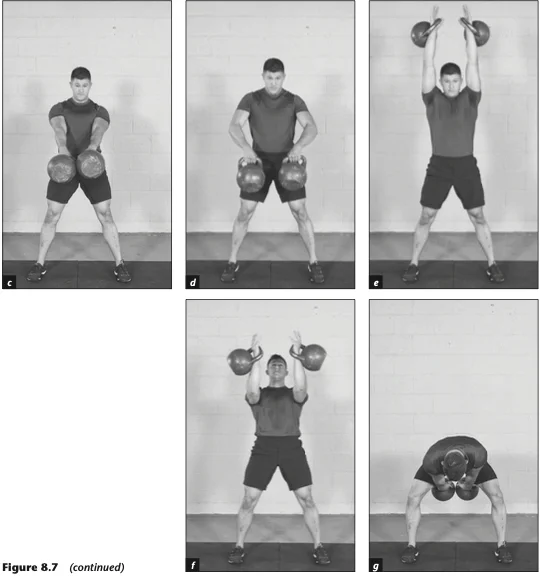
Figure 8.7 Double Half Snatch.
When performing this exercise, use anatomical breathing with two or three breathing cycles. One variation with two cycles is to start from the overhead position, inhale as you deflect back and drop the kettlebells, exhale at the back of the downswing, inhale as you upswing, and exhale on lockout. Another variation with three cycles is to start from the overhead position, inhale as you deflect back and drop the kettlebells, exhale at the back of the downswing, inhale, exhale as you begin the acceleration pull, inhale, and exhale on lockout.
Key Principles
- Maintain the connection between the torso and arm on the upswing for maximal leverage and power transfer.
- Some lifters will extend up on both toes at the beginning of the acceleration pull and dip just before the kettlebells reach fixation. These additional actions are appropriate for heavier kettlebells because they shorten the distance the load has to travel and accelerate the power output.
| common error | error correction |
|---|---|
| No connection between the arm and the hips and torso on the upswing | If you have a coach or are coaching someone, a verbal cue of "Stay connected" is helpful. Fasten a resistance band around both arms to keep the arms connected to the torso. |
| Lack of deflection on the upswing and while dropping the kettlebell into the downswing | If you have a coach or are coaching someone, a verbal cue of "Deflect back" is helpful. It is also helpful to swing in front of an object (e.g., wall, mat) at arm's length; if you don't deflect back, you will hit the object. |
| Banging your wrist or forearm on the kettlebell | You are most likely inserting your hand too early, too late, or at an incorrect angle. Use a hand-insertion drill where you visualize a ladder with four rungs in front of you on the vertical plane. Gradually climb the ladder, inserting your hand with a claw grip. Rung 1 is chest level, rung 2 is face level, rung 3 is just over your head, and rung 4 is near the top just before your arm reaches full extension. Clean up and release the fingers to insert the hand at each level, then drop down into the backswing between each insertion. |
| Vertical rather than horizontal trajectory on the backswing | Use pendulum hip and knee mechanics. It is also helpful to precede the double snatch with a double low swing. |
| Lack of fixation in the overhead position | Hold the kettlebells in lockout position for time. Stand in one place, walk in clockwise and counterclockwise circles, or move around the room in any pattern. |
| Exaggerated trajectory on the upswing and downswing | Snatch in front of a wall as you visualize yourself lifting inside a chimney. If you hit the wall, you're doing it incorrectly. |
Double Alternating Snatch
The double alternating snatch is one of the most advanced movements you can do in kettlebell training and is highly beneficial in multiple regards (e.g., speed, power, coordination). High levels of body awareness, power, and coordination are necessary to safely perform the double alternating snatch, so special attention must be paid to alignment, breathing, and movement mechanics. There are two variations of this exercise: two count and one count.
Two-Count Variation
For the two-count variation, deadlift two kettlebells from the floor (see figure 8.9a), sit back with the hips to swing both kettlebells between your legs (see figure 8.9b), and accelerate and snatch one kettlebell over your head (see figure 8.9c). Deflect the torso back to drop the kettlebell down (see figure 8.9d), again swing both kettlebells between your legs (see figure 8.9e), and snatch the other kettlebell over your head (see figure 8.9f).
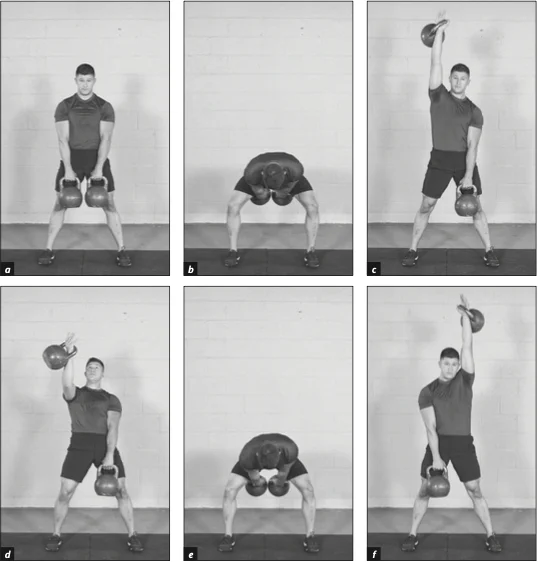
Figure 8.9 Double Alternating Snatch: Two-Count Variation.
When performing this exercise, use anatomical breathing with three or more breathing cycles. One variation is to start from the overhead position, inhale as you deflect back and drop the kettlebell into the downswing, exhale at the back of the downswing, inhale during the upswing and hand insertion, and exhale as the kettlebell lands in the overhead position. Another variation is to start from the overhead position, inhale as you deflect back and drop the kettlebell into the downswing, exhale at the back of the downswing, inhale, exhale as you begin hand insertion, inhale, and exhale as the kettlebell lands in the overhead position. Also note that during the two-count variation, recovery breaths can be taken in the overhead position to allow for proper recovery and pacing.
One-Count Variation
The one-count variation is more intense, and its more precise timing and coordination leave little margin for error. In the two-count variation, there is a natural pause as the kettlebell comes to fixation in the overhead lockout position. During the one-count variation, however, there is no stopping point, and one side must pull as the other is dropping. The one-count variation requires a continuous rhythm to sustain the set.
For the one-count variation, deadlift two kettlebells from the floor (see figure 8.10a), sit back with the hips to swing one kettlebell between your legs (see figure 8.10b), and accelerate and snatch the kettlebell over your head (see figure 8.10c). As the kettlebell completes the overhead fixation, bend your legs and drop your center of mass (see figure 8.10d); as you let the top kettlebell fall into the drop, the other arm pulls and the legs bend as the kettlebell is pulled to fixation between the legs (see figure 8.10 e and f). Focus only on the pulling hand while letting the overhead arm relax into the drop. Once you start the pull with the one hand, the momentum carries it to the overhead lockout (see figure 8.10g).
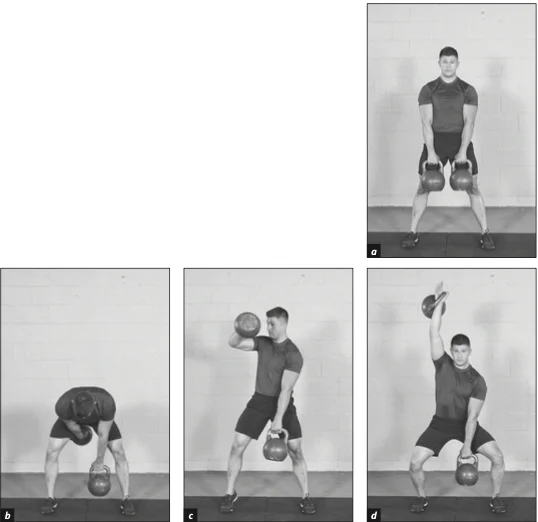
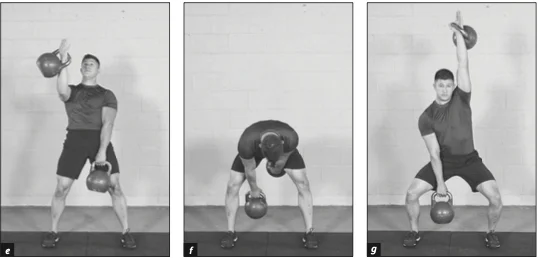
Figure 8.10 Double Alternating Snatch: One-Count Variation.
When performing this exercise, use paradoxical breathing with one breathing cycle due to the accelerated movement and tempo. Exhale as you lower one kettlebell and simultaneously bring the other up to the overhead position. Inhale quickly and repeat the sequence. There is no place for recovery breaths during the one-count variation because it is a continuous movement.
Key Principles
- For the two-count variation, as in the alternating clean, you will not have much of a backswing and will have to pull the kettlebell up from the more static hang position using a quad-dominant thrusting force to accelerate the bells.
- The two-count variation is also similar to the alternating clean in that it is more appropriate as a power exercise, doing fewer reps and using challenging loads.
- As with the alternating clean, use pendulum spring mechanics in the two-count variation and squat mechanics in the one-count variation.
- For the one-count variation, the motion initiates with the drop into the squat. This creates the momentum for both the bell that is traveling up and the bell that is descending.
| common error | error correction |
|---|---|
| Not deflecting back before dropping the kettlebell into the backswing for the two-count variation | Swing in front of an object (e.g., wall, mat) at arm's length; if you don't deflect back, you will hit the object. |
| Not keeping the nonsnatching arm connected to the hips and torso in the two-count variation | Fasten a resistance band around the nonsnatching arm and torso to reinforce the arm staying connected to the torso. Practice with one side and then switch the band to the other arm and practice with the other side. |
| Struggling with the timing of simultaneously pulling one kettlebell up as the other drops in the one-count variation | Bend your legs and drop your center of mass rapidly as you let the kettlebell fall into the drop. |
Double Jerk
The double jerk is a premier power-generation exercise that develops multiple attributes on the athletic conditioning continuum, including explosiveness, flexibility, structural integrity, strength, timing and coordination, breath capacity, and bilateral symmetry. It is a classic exercise, but it is listed here as an advanced exercise because it requires a high degree of timing and control, which can only develop after establishing a solid foundation in the basic movements, such as the press, push press, and squat. The key limitation in performance of the double jerk is the bilateral deficit, or the disparity in range of motion, strength, and coordination between one hand and the other. In other words, you can only go as far as your weakest hand takes you.
- Half squat (first dip)
- Bump (send-off)
- Undersquat (second dip)
- Fixation (stand to lockout)
- Drop to rack position
To perform this exercise, with the kettlebells on the floor, grab the handles with the finger-lock grip and load the hips into the start position (see figure 8.11a). Clean the kettlebells to the chest into the rack position (see figure 8.11b). From the rack position, move rapidly into the half squat or first dip as you exhale (see figure 8.11c). It's important to maintain the connection between the elbows and torso and the heels and ground when executing the half squat in order to maximize power transfer from the lower body to the upper body. From the half squat, immediately extend the ankles, knees, hips, and torso into the forceful bump (send-off), making sure to keep the elbows connected to the torso (see figure 8.11d). The bump involves what is called quadruple extension, where the ankles, knees, hips, and torso all extend maximally. The final position involves the hips being up and forward while the shoulders are held down and back.
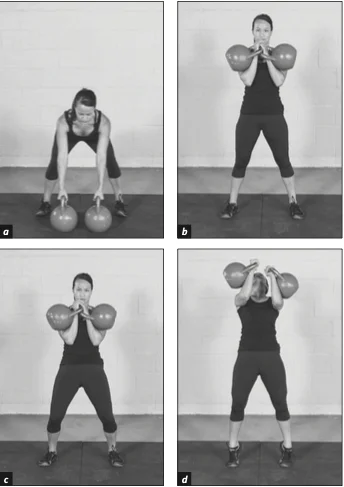
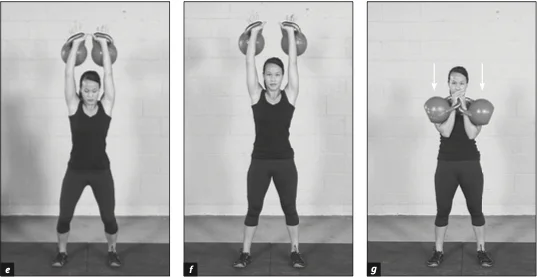
Figure 8.11 Double Jerk.
From completion of the bump, drop immediately into the undersquat or second dip (see figure 8.11e). Again, be aware that the half squat, bump, and undersquat must all be performed with maximum speed and that the elbows should maximally lock out in the undersquat at same time that the heels strike the ground. To maximize efficiency, the arms are locked via dropping down into a squatting posture versus pressing up when executing the undersquat. The depth of the undersquat depends on your anatomy and conditioning. People with strong legs and triceps will drop deeper, whereas lighter competitors whose primary advantage is speed will likely use a shallower undersquat.
Press the knees back to fully extend the legs into fixation, with elbows and knees straightened (see figure 8.11f). There are two primary movement mechanics to accomplish fixation, or stand to lockout. First, simply stand up to the overhead posture. Second, perform a knee roll, which involves keeping the hips at the level of the undersquat and only rolling the knees backward to lockout. The fixation in the final lockout position involves fully extending the elbow, keeping the arm in close proximity to the centerline of the body, externally rotating the shoulder (triceps facing forward and thumb back at an angle), and keeping the rib cage open. Depending on mobility, the body can be aligned in a straight line or positioned with the chest forward and pelvis tilted to the rear. Optimal fixation is with the biceps directly next to the ears. Each lifter must find the best sagittal alignment for her structure.
Drop the kettlebells back to the rack position (see figure 8.11g). The triceps relax and the bells are lowered to the rack position via a smooth, controlled drop. The force of the bells coming down is absorbed when you rise onto your toes and bring your chest toward the bells. As the elbows begin to land in the rack position, the heels are lowered and the thoracic spine rounded to safely diffuse the load. The knees may be bent slightly as well. It is optional to rise onto your toes at beginning of the drop or to stay flat-footed throughout the drop.
When performing this exercise, use anatomical breathing with four or five cycles. Inhale before the first dip, exhale during the half squat, inhale on the bump, exhale upon landing to the undersquat and then to lockout, take an additional breathing cycle in the top position, inhale at the beginning of the drop, and exhale as the elbows make contact into the rack. If a deep undersquat is used, take an additional breath cycle between completion of the undersquat and fixation (i.e., five total cycles with a deep undersquat and four total cycles with a shallow, quick undersquat).
Key Principles
- Move the legs as fast as possible to maximize power transfer from the ground up.
- Maintain the connection between the torso and arms as long as possible through the bump phase of the jerk.
- Decelerate the kettlebells as much as possible during the drop to reduce body impact.
| common error | error correction |
|---|---|
| Losing the connection between the elbow and hip and the heels and floor when descending into the half squat | Practice the half squat without jerking to ingrain the movement as a reflex. |
| Descending too slowly when dropping into the half squat | Focus on dropping into the half squat to activate a stretch reflex to facilitate a stronger bump. |
| Pressing to lockout instead of dropping to the undersquat to lock the arms | Lockout overhead an empty bar or 5 ft (1.5 m) PVC pipe. From a standing position, practice rapidly dropping into the undersquat without bending or pressing with the arms. |
| Slow transition from the undersquat to lockout | Using the lockout squat, isolate and practice the motion of ascending quickly from the undersquat to lockout. |
Double Clean And Jerk
The double clean and jerk is the most comprehensive kettlebell lift. The entire kinetic chain is involved in the execution of this all-body lift, and a joint-by-joint analysis of the movement will show a perfect mixture of stability and mobility. Furthermore, all phases of the stretch-shortening cycle are present in a given repetition, making this lift truly plyometric and perfect for increasing explosive power, or the ability to accelerate rapidly. Because of this, the double clean and jerk is used for power development in cross-training for many sports.
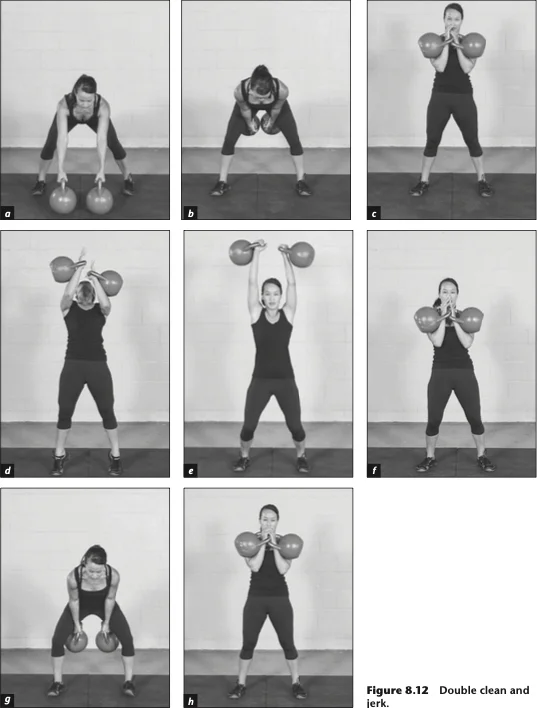
Figure 8.12 Double Clean And Jerk.
To perform this exercise, start with two kettlebells on the floor in front of you. Grip each with the finger-lock grip and sit back to load the hips (see figure 8.12a). Pick up and swing both kettlebells between the legs (see figure 8.12b), then swing forward and up to clean the kettlebells to the chest and establish your solid rack position (see figure 8.12c). Half squat and immediately extend the legs and torso as you rise maximally onto the toes to bump the kettlebells off the chest (see figure 8.12d), then immediately sit the hips into an undersquat while the arms extend fully into lockout (see figure 8.12e). Finish the fixation of the jerk so that the legs and arms are fully extended. Deflect the torso back and drop the kettlebells to the rack position (see figure 8.12f). Rising onto the toes at the beginning of the drop is optional. Drop from the rack position into a backswing (see figure 8.12g). Most lifters will use a thumbs-forward position for the double clean and jerk; however, the thumbs-backward and neutral-thumb positions are also acceptable. Reclean the kettlebells to rack position (see figure 8.12h).
When performing this exercise, use anatomical breathing with eight or more breathing cycles. From the rack position, inhale before dropping into the half squat, exhale during the half squat, inhale as you extend your legs and body during the bump, exhale as you sit your hips back and drop into the undersquat, inhale as your legs extend into fixation, exhale at completion of the fixation, take one breath cycle while holding fixation, inhale as the body deflects back, exhale as the kettlebells fall into the rack position, take one breath cycle while in the rack position, inhale as you deflect back to drop the kettlebells, exhale with the backswing, inhale and exhale as the kettlebells swing forward, and inhale and exhale as the kettlebells are cleaned to the chest. Takes as many recovery breaths as needed before the next repetition.
Key Principles
- Use pendulum hip mechanics.
- Maximize the connection between the arms and torso.
- Move the legs as fast as possible to maximize power transfer from the ground up.
- Maintain the connection between the torso and arms as long as possible through the bump phase of the jerk.
- Decelerate the kettlebells as much as possible during the drop to reduce body impact.
- Take multiple, continuous breaths (eight or more breath cycles per rep) to keep your breathing and heart rate under control.
| common error | error correction |
|---|---|
| Performing the clean to the chest in two movements instead of one | Bring your elbows to the ilia at same moment the kettlebells touch the chest. |
| Insufficient flexibility to extend the hips in the rack position | Practice the flexibility and mobility exercises from chapter 6 or rack holds later in this chapter. |
| Descending too slowly when dropping into the half squat | Focus on dropping into the half squat to activate a stretch reflex to facilitate a stronger bump. |
| Pressing to lockout instead of dropping to the undersquat to lock the arms | Lockout overhead an empty bar or 5 ft (1.5 m) PVC pipe. From a standing position, practice rapidly dropping into the undersquat without bending or pressing with the arms. |
| Slow transition from the undersquat to lockout | Using the lockout squat, isolate and practice the motion of ascending quickly from the undersquat to lockout. |
| Loss of grip during the clean component | Practice the farmer's carry for time in order to improve grip endurance. |
Bottoms-Up Push-Up
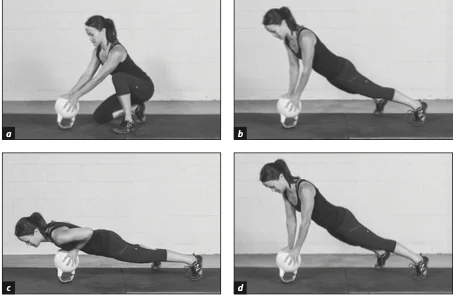
Figure 8.13 Bottoms-Up Push-Up.
The bottoms-up push-up is an upper-body conditioner that simultaneously develops horizontal pressing strength and anterior core stability due to the positioning and instability of the kettlebell and the added balance needed to perform it. It is considered an advanced exercise because skill is involved in performing it correctly and it is risky for anyone who lacks sufficient core stability to control the kettlebell and prevent it from tilting and falling.
To perform this exercise, place the kettlebell so that it is balanced on the handle (see figure 8.13a). You can position the handle either in vertical or horizontal alignment to exert more of a sagittal- or frontal-plane challenge, respectively. Use a floor surface that is not too slick so that the kettlebell does not slide around. Place both palms firmly on the bottom of the kettlebell. People with larger hands will have to turn the fingers outward so that only the base of the palm is placed on the bottom and the fingers wrap around the sides of the bell. Those with smaller hands can place both palms directly on the flat bottom of the kettlebell. Pressing firmly down through the center of the kettlebell, set your body in a plank position, supported on your hands and the balls of your feet (see figure 8.13b). Hold this balance and lower your body until your chest lightly touches your hands (see figure 8.13c), then press straight up until your arms are fully extended, with the elbows completely locked in the top position (see figure 8.13d). Proper alignment is with the palms in line with the center of the chest, elbows connected to the torso, and scapulae retracted, with a straight line running from the base of the neck to the heels. Keep the shoulders packed into their sockets by corkscrewing the arms into external rotation and contracting the lats. Note that the riskiest part of the exercise is dismounting from the kettlebell after your last set. Because the kettlebell is supporting your body weight, you should place your knees on the floor first to shift the body weight away from the kettlebell, and then let the kettlebell fall to the floor.
When performing this exercise, use anatomical or paradoxical breathing depending on your conditioning level. For the less conditioned, this exercise could approximate maximal effort with a few reps, so paradoxical breathing will keep the spine safe by creating high pressure in the thoracic cavity; inhale on the way down and exhale on the way up (one cycle). For those who are more conditioned, anatomical breathing is the better match and will facilitate better endurance; exhale on the way down and inhale on the way up.
A more advanced variation of this exercise is the double bottoms-up push-up. In this variation, do your push-up with one bottoms-up kettlebell supporting each palm. Setting up is a bit tricky, but you will figure out a method that works for you with a bit of trial and error.
Key Principles
- "Claw" the kettlebell. As mentioned earlier, both relaxation and tension tend to lead to more of the same. Thus, in this exercise, generate high degrees of tension via the grip, core, glutes, and lats to maximize structural integrity, body connectivity, and power.
| common error | error correction |
|---|---|
| Not tensing sufficiently to maximize body connectivity, strength, and alignment | Irradiate tension throughout the body by tensing the hands, lats, glutes, and core. |
| Hands out of alignment with the chest and too far forward | This compromises shoulder stability and performance. Keep the hands in line with the center of the chest. |
| Not packing the shoulder | Pack the shoulder by pressing both palms firmly and screwing them into the kettlebell. |
| Failing to keep the scapulae retracted | This deactivates the chest and puts too much stress on the shoulders. Focus on scapular retraction via rib cage expansion. Think to yourself, "Big chest." |
Squat Method Get-Up
As mentioned in chapter 7, the get-up has its lineage in Turkish grapplers using it as a full-body conditioning exercise that enhances the ability to make efficient and strong transitions from the ground to standing and vice versa. Though you may not be a grappler, the fairly complex movement patterns of the get-up may carry over nicely into your overall movement ability or agility. Chapter 7 presented a lunging pattern in the transitional posture between lying and standing. Here, the transition is a squat pattern, and this variation will be more challenging for most people because it demands greater mobility in the hips, upper spine, and shoulders.
Just as you did for the get-up in chapter 7, to perform this exercise, start by lying flat on your back. Raise your right arm straight up over your chest and bend your right knee so that the foot is flat on the floor; your left arm is flat on the floor at about a 45-degree angle (see figure 8.14a). Initiate the movement by flexing your abs slightly and then shifting your weight to your left arm, first to the shoulder, then the elbow, then the forearm, and finally the palm (see figure 8.14b). As your body weight transfers to your left palm, your left hand presses firmly into the floor and your left elbow extends, fully locked out (see figure 8.14c). This is the first stopping point and you are completely stable. Transition by lifting your hips off the floor and maximally extending them (see figure 8.14d). It is important that the force moves vertically as your hips extend; any forward drift of the right arm will cause you to lose control of the kettlebell.
Figure 8.14 Squat Method Get-Up.
Now, for the squat method, this is where the movement changes. Your weight is supported at two points at this stage—the left palm and the right foot. Keep these two points of contact stable and lift the extended left leg off the floor. Keeping your hips lifted, move your left leg directly under your left hip and plant it firmly on the floor (see figure 8.14e). Because this is a much narrower base compared with the lunge variation, your weight will be centered behind on your left palm. To complete this phase, you will need to push your body weight forward with your left palm until your weight is balanced solely on both feet. Complete this phase by lifting the left hand off the floor and extending the trunk upright (see figure 8.14f). From this squat position, complete the upward phase of the get-up by standing straight up (see figure 8.14g).
Now reverse the movement: Squat directly down to drop your center of mass by sitting back with your hips and bending both knees. Place your left palm flat on the floor behind you and sit back to shift your weight to the palm. Drop your hips further to sit on the floor. Complete the movement by dropping from left palm to forearm and then to shoulder while simultaneously extending both legs out in front of you to return to the lying position that you started from. It may feel more natural to slide the bottom arm along the floor as you are lowering yourself.
When performing this exercise, use natural breathing. Don't hold your breath at any point, but don't try to time the breath in any particular pattern.
Key Principles
- Review the overhead squat to familiarize yourself with the key alignment points of that phase of the get-up.
- Keep your eyes on the kettlebell at all times.
- When first learning the get-up, practice it without a kettlebell and use an object such as a yoga block, water bottle, or shoe to simulate holding a bell and ensure vertical alignment is used at all times.
- Ensure the kettlebell stays vertical throughout the movement.
- Keep your arm packed into your shoulder when the arm is fully extended overhead.
- When first learning the get-up, use a spotter.
- When transitioning from the ground to the beginning of the squat, it's important to brace with the free hand behind the torso to avoid falling backward.
| common error | error correction |
|---|---|
| Bringing the kettlebell over your face when transitioning the hands | Using both hands, bring the kettlebell around the top of your head to the other side. |
| Trying to sit up during the first segment of the movement | Roll up at a 45-degree angle using your elbow and foot as levers. |
| Rolling or pronating one or both ankles | Press both feet flat to the floor. |
| Allowing the knees to collapse inward in the bottom squat position (valgus collapse) | This occurs frequently and must be avoided because it will lead to injury to the medial (inside) ligaments of the knees. This is typically caused by a lack of hip activation, not a problem with the knees. To help avoid this, press your knees out to the sides as you lower yourself or place a 20 in. (51 cm) piece of tubing or a light band that is easy to stretch around the outside of the knees. |
Chair Press
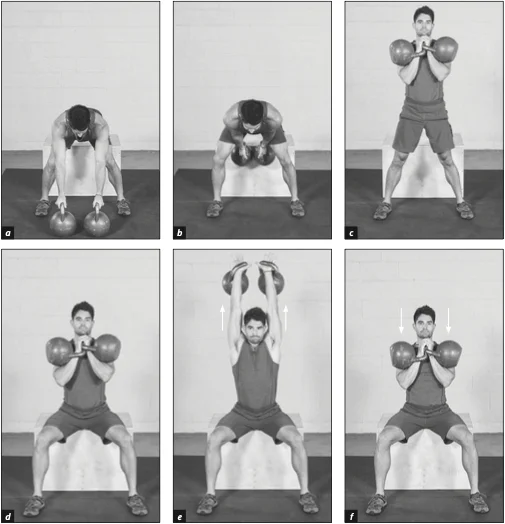
Figure 8.15 Chair Press.
A tremendous test of upper-body strength and endurance, the chair press demands additional core stability because it removes the assistance from the leg that is given in the standing press. The chair press is a nice way to include some periodic variation in your program and can be selected as a vertical pressing component in any well-rounded fitness program. We will show this exercise using two kettlebells, but you may also perform a single-arm chair press with one kettlebell.
Start with two kettlebells on the floor in front of you and grip with the finger lock (see figure 8.15a). Sit back with your hips to swing the kettlebells back between your legs (see figure 8.15b) and then to your chest (see figure 8.15c), and finally sit on a sturdy box or chair with no back support (see figure 8.15d). Keeping your feet flat on the floor, press directly up into lockout (see figure 8.15e). Lower the kettlebells to your chest to complete the rep (see figure 8.15f).
When performing this exercise, use anatomical breathing with four breathing cycles. Starting from the rack position, inhale deeply before the initial compression, and then exhale as you drop and flex your thoracic spine. Inhale as you bump with the rib cage, and exhale as you lock out. Take one full breath cycle while in lockout and add more recovery breaths if needed. Inhale as you begin to drop the kettlebell, and exhale as it lands back in the rack position. Take recovery breaths while in the rack position before the next rep.
Key Principles
- Keep the arm packed into the shoulder when pressing.
| common error | error correction |
|---|---|
| Leaning back during the press | Keep the abdominal muscles firm and braced, as if preparing to take a punch. |
| Hips shifting from one side to the other | Keep your feet flat on floor, hips squared to the front of the room, and abdominal muscles firm. |
| Bilateral deficiency, the limitation of the strength and endurance from the weaker, nondominant arm | Train the standing press and chair press with one arm at a time to develop more equality between the dominant and nondominant arms. |
Overhead Squat
The overhead squat is a great exercise for well-rounded development, simultaneously training balance, flexibility, coordination, stability, mobility, and strength. As a prerequisite, you should feel comfortable with the front squat, because the lower-body mechanics involved are identical. The overhead squat has the added challenge of stabilizing the upper body by supporting the load overhead while squatting.
In the unloaded version, using just a stick, the overhead squat is a standard test that is effective in developing the range of motion needed for the kettlebell version. The overhead squat and its variations are also often used for movement screening and assessment of movement quality. Thanks to the combination of movement and stabilization involved in this movement, a well-trained eye can spot assorted movement deficiencies just by having the athlete, patient, or client do a few repetitions with only a stick overhead. This movement pattern can be tested regularly to note improvement as verification of a well-designed program. Now put a kettlebell overhead, and especially two kettlebells, and the demands change this movement from a basic assessment, to an advanced (single kettlebell) exercise, to a super advanced (double) exercise. Before trying the kettlebell overhead squat, you should test the movement pattern with a stick, rope, or PVC pipe. You want to have great control in the unloaded version before spending any time with the kettlebell versions. Truthfully, the single kettlebell will be easier than just the stick alone once you get the hang of it. This is because the unilateral overhead squat allows for a significant amount of rotation in the hips, shoulders, and torso, and the additional rotation creates slack throughout the body, which allows for postural compensations in order to get vertically underneath the load.
Phases of Progression
Intermediate Exercises
Single-arm and double-kettlebell variations and complex full-body movements that build on the basic lifts: single-leg deadlift, double swing, double clean, jerk, windmill, get-up, and more.
Creating a Customized Fitness Program
How to design effective kettlebell training programs for fat loss, strength endurance, and power — with sample programs for beginners, intermediate, and advanced exercisers.