Preparation Phase: Warm-Up
Prepare Body and Mind to Lift
Before you jump into the main phase of your kettlebell training, you have to prepare your mind and body for the hard work to follow.
Being prepared mentally and physically before the main phase can make the difference between a successful and an unsuccessful workout — and there is also a safety component to be mindful of in any sensible kettlebell program.
Why Warm Up?
You will not be able to perform optimally until you are warmed up. A proper warm-up provides numerous physiological and psychological benefits.
Physiological Benefits
More Blood to Working Muscles
Higher Muscle & Core Temperature
Better Cardiorespiratory Performance
Primed Nerve-to-Muscle Pathways
Reduced Muscle Stiffness
Lubricated Joints
Full Range of Motion
Adrenaline & Heat Dissipation
Better Coordination & Reaction Times
Psychological Benefits
Increased Arousal & Focus
A Clear Mind
Body and Mind Together
What Happens If You Skip the Warm-Up
A proper warm-up can save a lot of unnecessary wear and tear on your body over years of physical training with kettlebells or any other vigorous activity.
When blood flow is restricted, the muscles — including the heart — get an inadequate supply of oxygen. Chest pain, heart damage, or muscle pain can be the result.
Moving straight into intense exercise without a preparatory warm-up can also cause:
Arrhythmia
Early Fatigue
Muscle Strains
Joint Injury
How Long Should the Warm-Up Be?
The degree and duration of the warm-up depend on a few factors, and will most likely vary from one workout to the next.
Age & Fitness Level
Training Experience
Injuries & Health History
Weather
Intensity of the Main Phase
- A quick 20–30 minute main phase may need only a 5-minute warm-up.
- A serious athlete training for 2 hours may need an extensive warm-up of up to 30 minutes.
The Four Stages of a Warm-Up
A well-constructed warm-up consists of up to four separate stages, each one preparing for the next. You may include every stage, or select only one or two stages suitable for the workout to follow.
General warm-up
Aerobic activity to raise the pulse, plus joint mobility rotations.
Dynamic mobility warm-up
Active movements that take joints and muscles through full range under control.
Sport-specific warm-up
Lighter versions of the kettlebell lifts you'll perform in the main phase.
Static stretching warm-up
Short, gentle holds for the muscles and joints you're about to load.
Stage 1 — General Warm-Up
The overall approach to the general warm-up is to focus on warming the large muscle groups of the body — the quadriceps, calves, hamstrings, hip flexors, shoulders, and so on. The general warm-up has two parts:
Aerobic Activity (Pulse-Raiser)
Joint Mobility Exercises (Rotations)
Aerobic Activity
Aerobic activity to raise the pulse can consist of any number of aerobic movements that circulate blood and oxygen to supply the muscles with more energy. The most common is an easy jog of 5 to 10 minutes. In place of jogging you can select any of these light aerobic activities:
- Brisk walking
- Marching in place
- Skipping forward and backward
- Lateral shuffling
- Low-intensity agility drills, such as two-legged hopping in all directions, speed ladders, or cone drills
- Body-weight squats or other simple calisthenics
- Shadowboxing — throwing loose, easy punches while bouncing and shuffling around like a boxer
- Skipping rope
- Other light-intensity cyclical aerobic movements
Joint Mobility Exercises
Upon completion of the gentle pulse-raiser, move directly into joint mobility rotations. Joint rotations lubricate the entire joint with synovial fluid and let your joints function more easily when called upon to lift the kettlebells.
Mobilize all the major joint structures of your body:
Fingers & Knuckles
Wrists
Elbows
Shoulders & Shoulder Girdles
Trunk
Neck
Hips
Spine
Ribs
Knees
Ankles
Toes
The exercises that follow collectively represent the major joints of the body. This list is by no means exhaustive — the study of mobility is as unlimited as life, with rich traditions in dancing, yoga, martial arts, and many other movement-based systems.
Finger Flexion and Extension

Figure 5.1 Finger (a) flexion and (b) extension.
With your palm facing up, use the opposite hand to alternately pull your fingers toward you (see figure 5.1a) and push them away from you (see figure 5.1b). Hold each end position for 1 second. Switch hands and repeat.
Interlocked Wrist Rolls
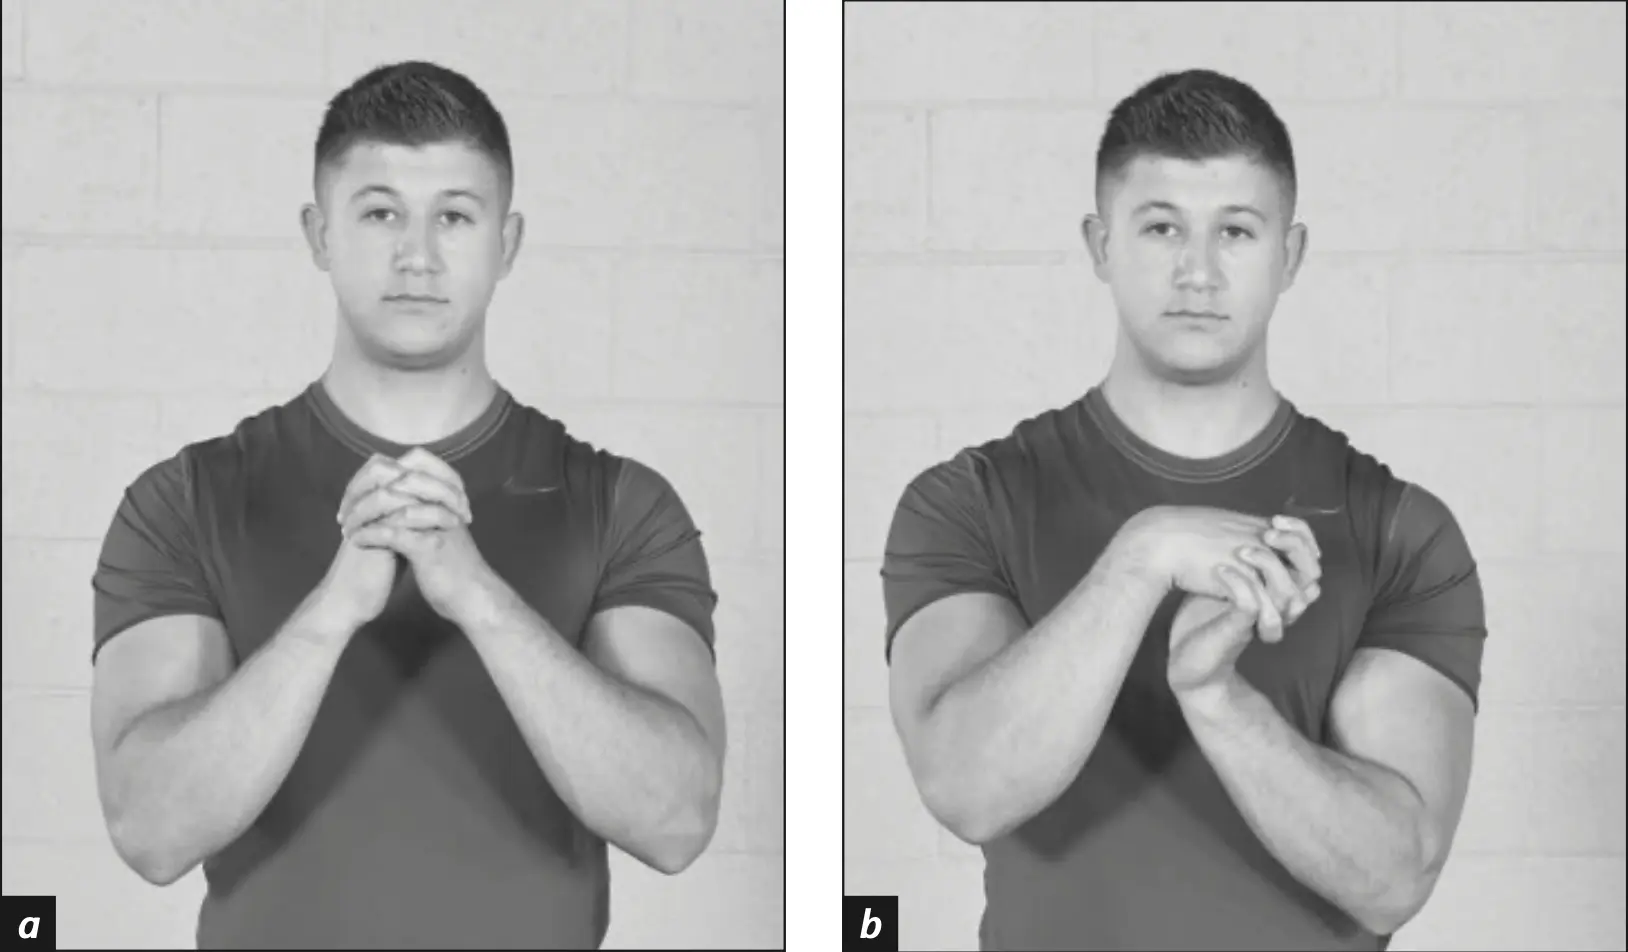
Figure 5.2 Interlocked wrist rolls.
Interlace your fingers with your palms facing each other (see figure 5.2a). Circle your wrists in a clockwise direction for 10 to 20 seconds (see figure 5.2b) and then repeat in a counterclockwise direction.
Elbow Circles
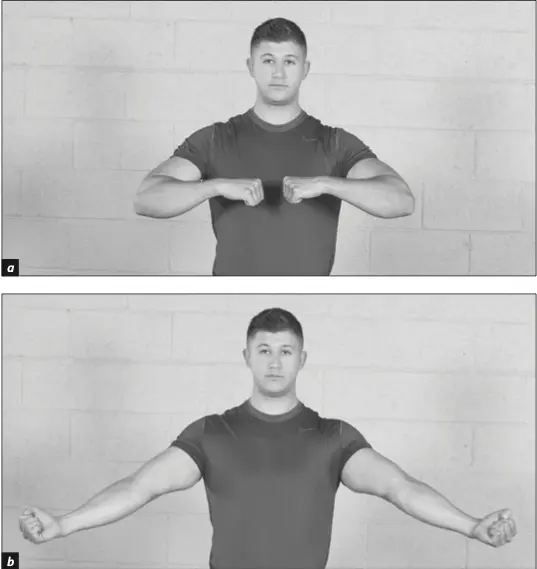
Figure 5.3 elbow circles.
Make a relaxed fist with both hands (see figure 5.3a). Rotate your arms at the elbow joint so that the right arm circles in a clockwise direction and the left arm circles in a counterclockwise direction for 20 to 30 seconds (see figure 5.3b). Reverse directions.
Forearm Extension and Flexion
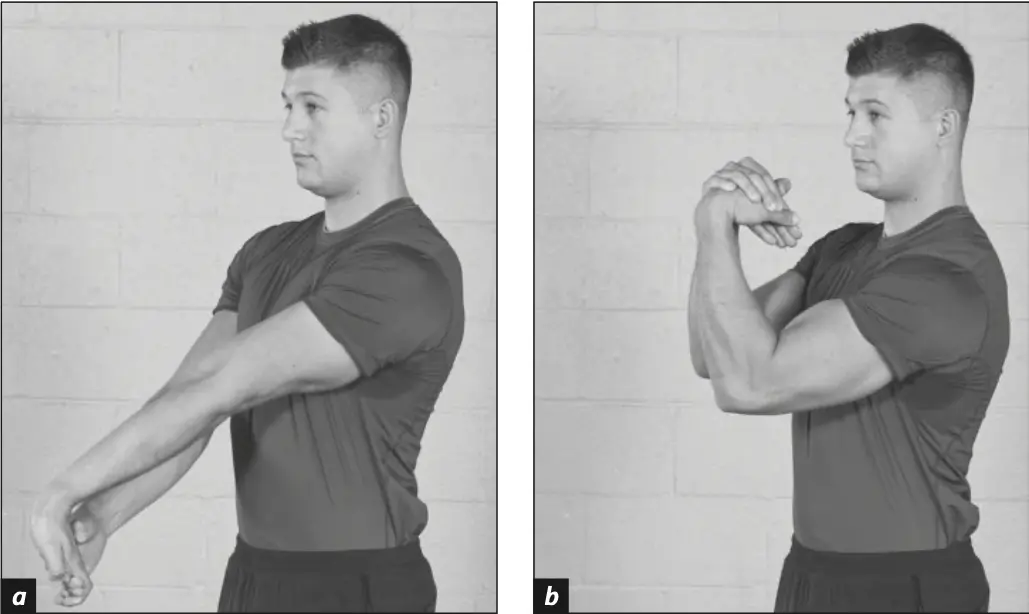
Figure 5.4 Forearm (a) extension and (b) flexion.
With your palm up, extend your elbow straight and point your fingers toward the ground so that the palm is facing forward. Using the opposite hand, push the fingers toward you while pushing the palm farther away from you for 2 seconds (see figure 5.4a). You will feel the stretch in the top of the forearm. Next, grab the back of the hand and push the palm back toward you for 2 seconds (see figure 5.4b). You will feel the stretch on the backside of the forearm. Repeat with the other hand.
Shoulder Rolls
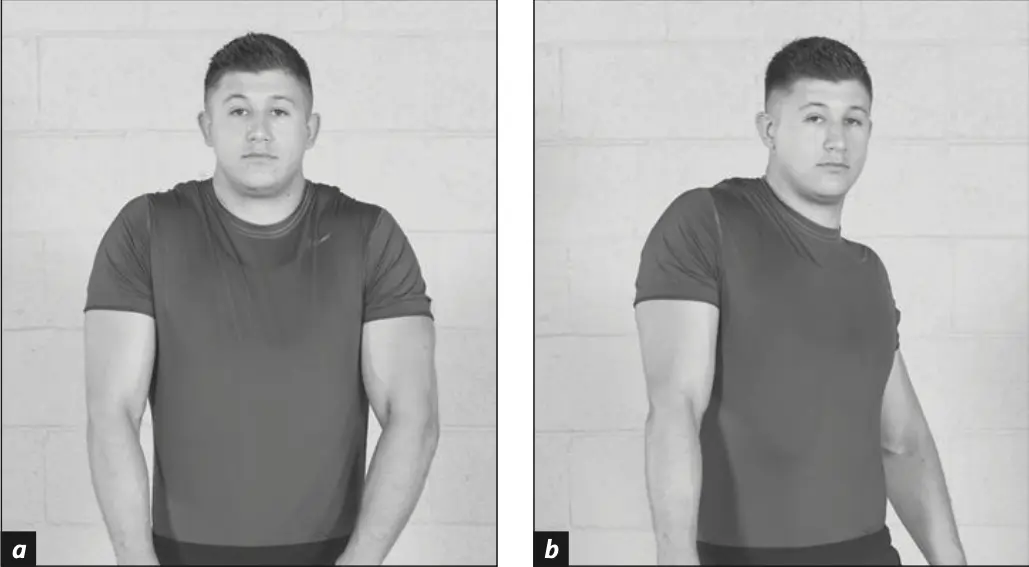
Figure 5.5 shoulder rolls: forward with (a) both shoulders and forward with (b) one shoulder.
Make big circles while shrugging your shoulders as if you are trying to scratch your earlobes with the top of your shoulder. Move both shoulders at the same time forward (see figure 5.5a) and then backward. Then, alternate moving one shoulder at a time forward (see figure 5.5b) and backward.
Neck Tilts
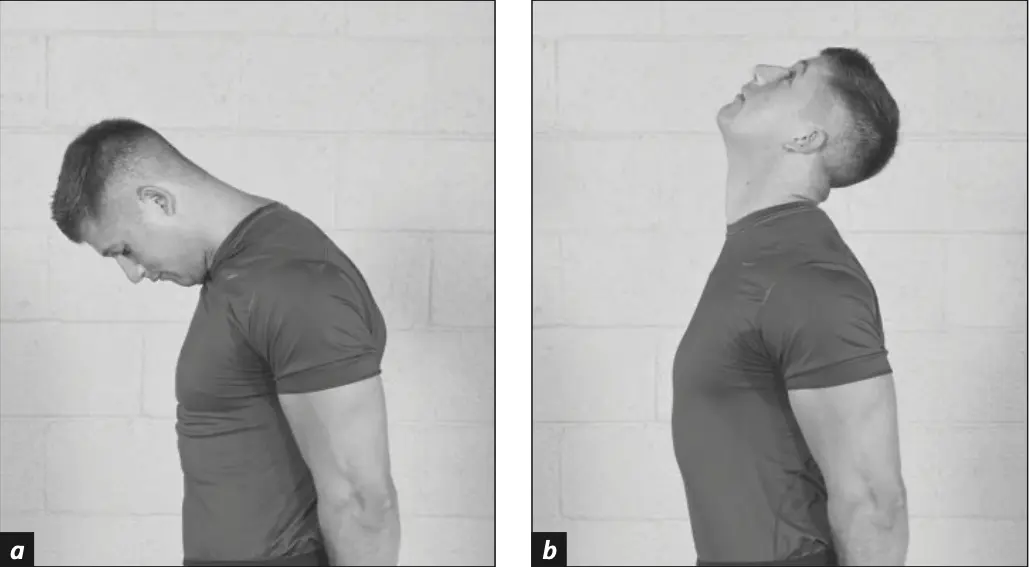
Figure 5.6 neck tilts: (a) down and (b) up.
Look forward and drop your chin to your chest for 2 seconds (see figure 5.6a). Then, lift your chin and look up, lifting the chin to the ceiling for 2 seconds (see figure 5.6b). Repeat this up and down and gradually increase the range of motion as your neck relaxes.
Neck Rotations
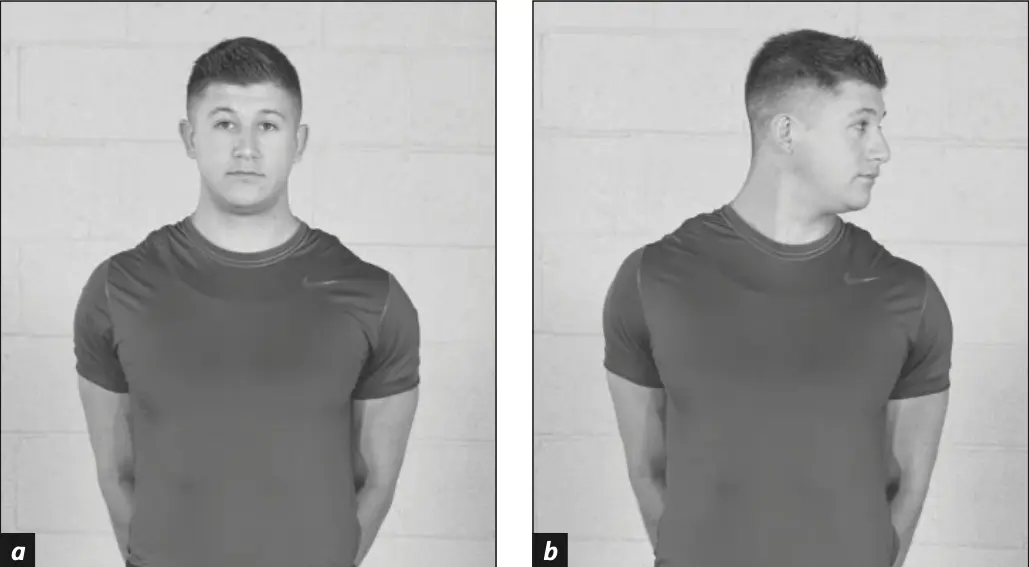
Figure 5.7 neck rotation.
Look forward (see figure 5.7a). Leading with your eyes, turn your head to the left while keeping your shoulders still and only turning your head (see figure 5.7b). Then, turn your head to the right. Repeat this side-to-side motion and gradually increase the range of motion, holding the end position for 2 seconds on each side.
Neck Circles
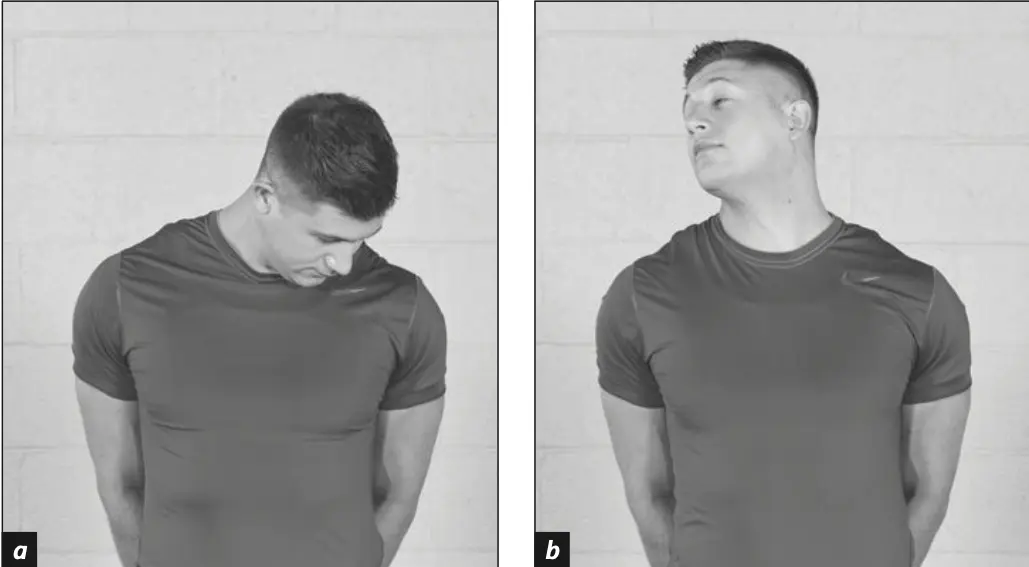
Figure 5.8 neck circles.
Let your head be heavy and relaxed (see figure 5.8a) and move the entire head in a large circle in a clockwise direction (see figure 5.8b). Then, repeat the movement in a counterclockwise direction. To control the movement, take 2 to 3 seconds per rotation.
Hip Circles
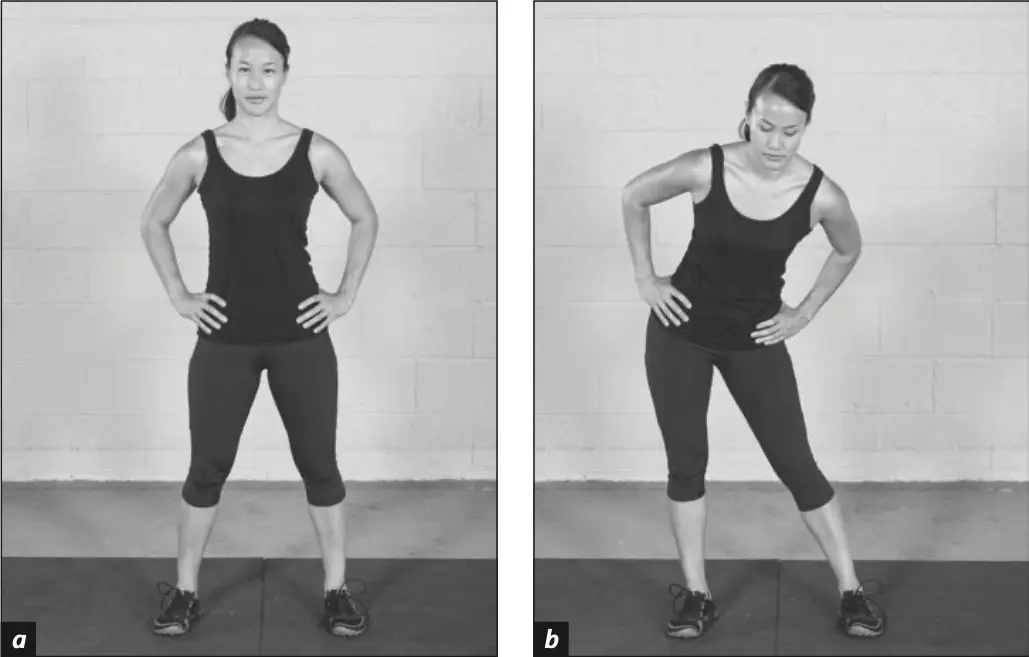
Figure 5.9 hip circles.
Place your hands on your hips (see figure 5.9a) and make a big circling movement in a clockwise direction with your hips as if you were using a hula hoop (see figure 5.9b). Repeat the circle 10 to 15 times and then move in a counterclockwise direction. Maintain a steady cadence of about 2 seconds per rotation.
Trunk Twists
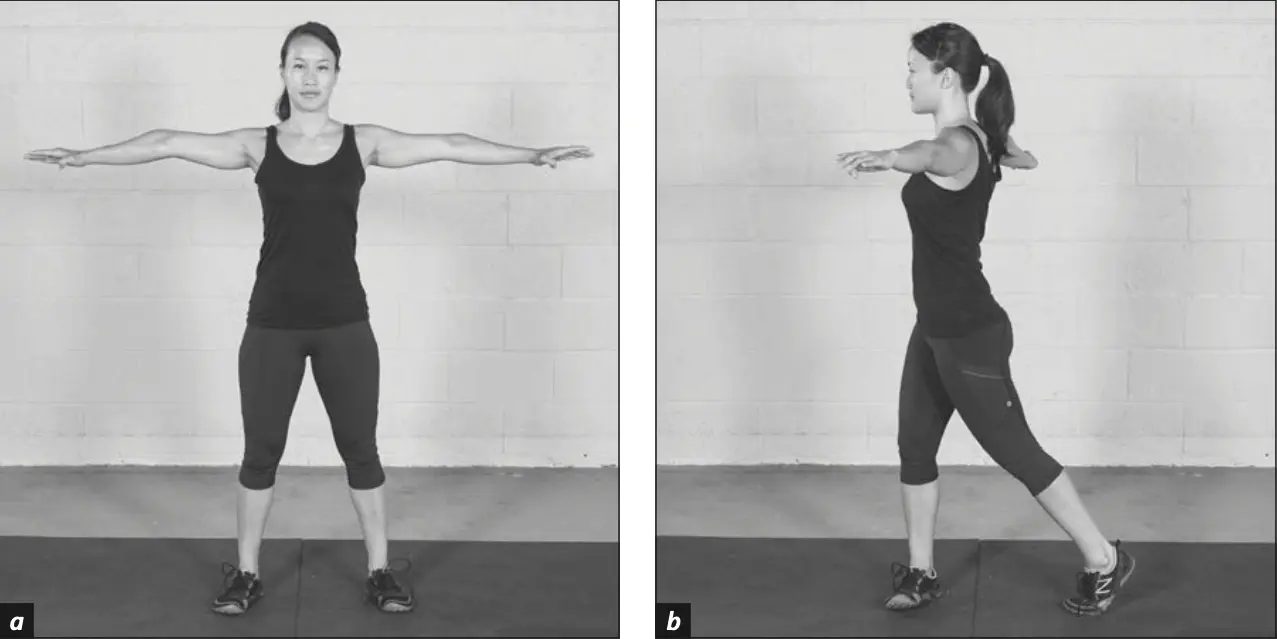
Figure 5.10 trunk twists.
Stand with arms out to your sides and relax (see figure 5.10a). Twist your body to one side as you shift your weight to the side you are twisting, and at the same time, raise the opposite foot while you pivot (see figure 5.10b). Repeat the twist back and forth from one side to the other. Gradually increase the range of motion as you get warmer.
Lateral Bends
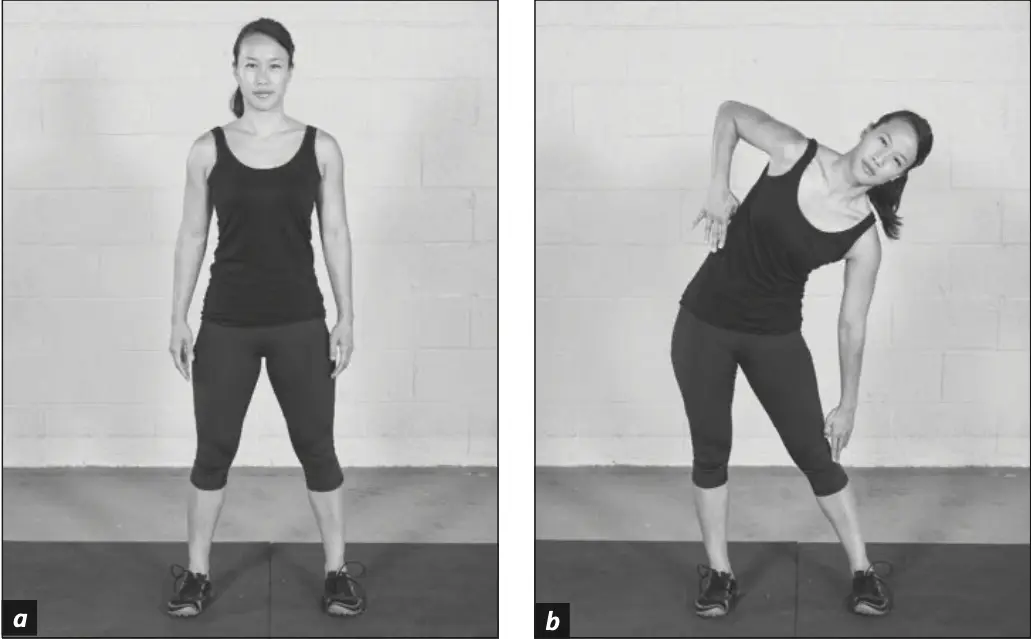
Figure 5.11 lateral bends.
Stand upright and drop your hands relaxed to your sides (see figure 5.11a). Tilt your body to one side and allow that hand to slide down along the side of your body (see figure 5.11b). To help maintain alignment, lift your opposite elbow up as you bend. Do not bend forward; try to stay as upright as possible so the stretch is along the side of your body. Then, tilt the other direction, repeating back and forth. Use a cadence of 2 seconds per side.
Waist Bends
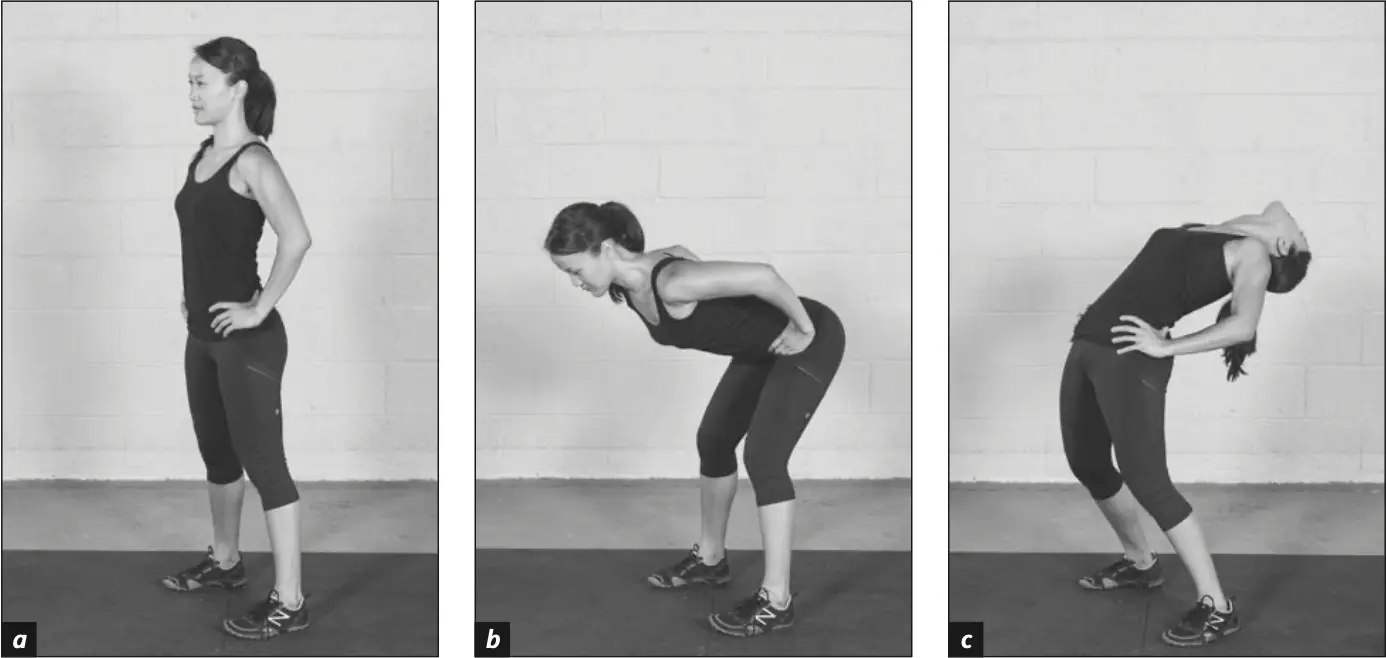
Figure 5.12 Waist bends.
Place your hands on your hips and keep your legs straight (see figure 5.12a). Fold forward at the waist as you look down to the floor (see figure 5.12b). Raise yourself with the hips and look up as you do a gentle backbend (see figure 5.12c). Repeat continuously, 2 seconds in each direction.
Figure-Eight Waist Circles
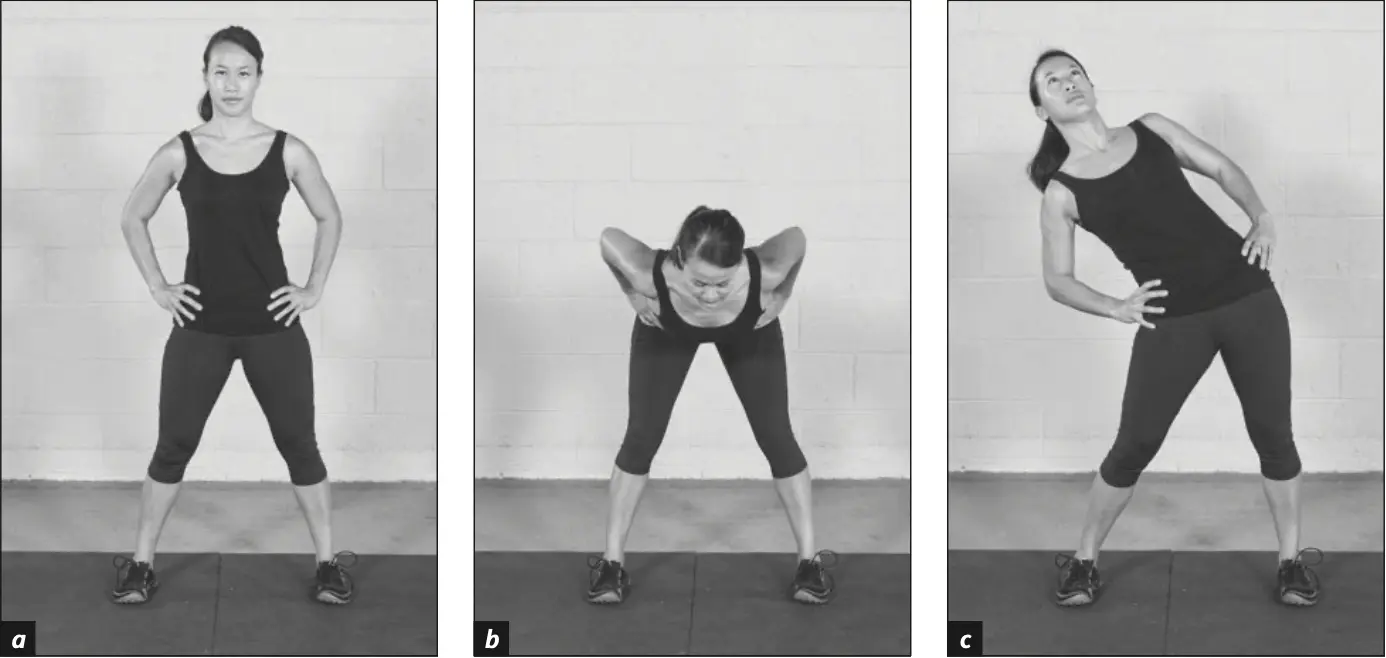
Figure 5.13 Figure-eight waist circles.
Place hands on your hips (see figure 5.13a). Fold forward at the waist as you exhale (see figure 5.13b), and as you inhale, circle your trunk up (see figure 5.13c) and back into a gentle back bend. Exhale and fold forward again, then inhale and circle up and back in the opposite direction. Repeat in each direction continuously, 2 seconds in each direction.
Spinal Rolls
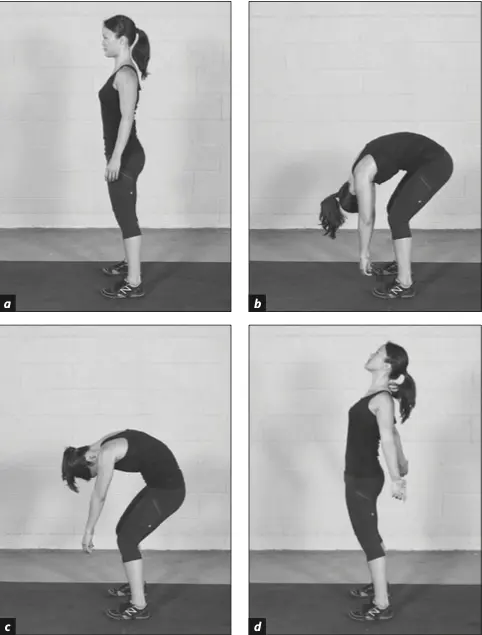
Figure 5.14 Spinal rolls.
Stand upright and relax completely (see figure 5.14a). Exhale as you fold forward at the waist, dropping your upper body toward the floor (see figure 5.14b). Inhale and slowly roll back up to the upright position, moving one vertebra at a time from the lower spine up to the upper spine (see figure 5.14, c and d).
Lateral Rib Openers
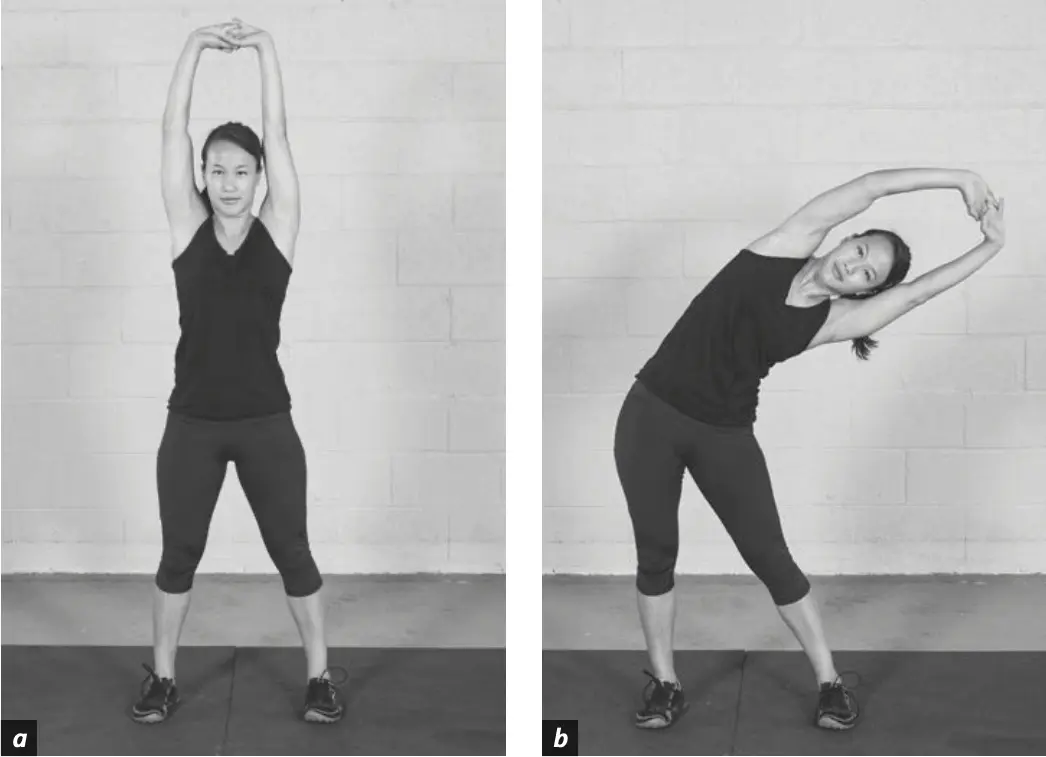
Figure 5.15 lateral rib openers.
Interlace your fingers and press your arms overhead with palms facing up (see figure 5.15a). Inhale in this position, and then exhale as you reach up and over to the side, stretching the side of your opposite rib cage (see figure 5.15b). Inhale, return to start position, and exhale as you stretch the ribs on the other side. Repeat continuously, taking 3 seconds to stretch to the side and back to the top.
Knee Circles
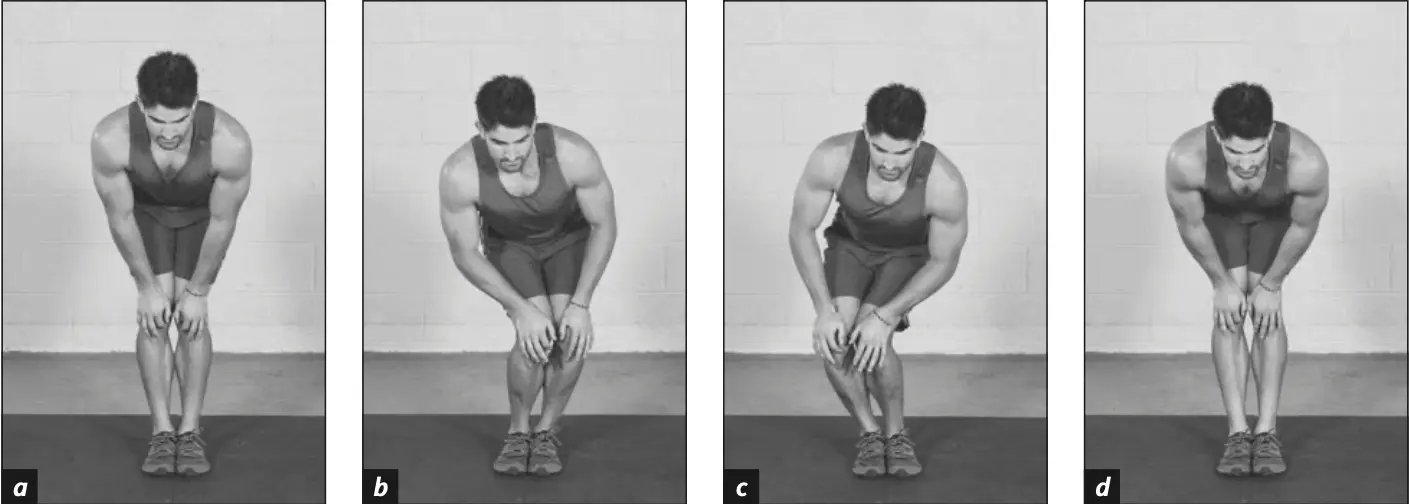
Figure 5.16 Knee circles.
With your feet together, place your hands on your kneecaps (see figure 5.16a). Gently bend the knees into a partial squat with heels flat on the floor and circle them clockwise until they are straight again (see figure 5.16, b-d). Repeat in a counterclockwise direction.
Ankle Bounces

Figure 5.17 Ankle bounces.
Rise onto your toes as high as you can (see figure 5.17a), and then lift your toes as you rock back onto your heels (see figure 5.17b). Repeat this toe–heel movement back and forth. Use your hands to counterbalance your lower-body motion so you can maintain balance.
Stage 2 — Dynamic Mobility Exercises
You're warming up for a workout that's going to involve a lot of dynamic activity, so it makes sense to perform some dynamic exercises to increase your dynamic flexibility. This will prepare your body for the dynamic and explosive kettlebell lifts during the main phase.
Dynamic mobility is accomplished by performing movements in all directions while gently increasing range of motion and speed.
Arm Twirls
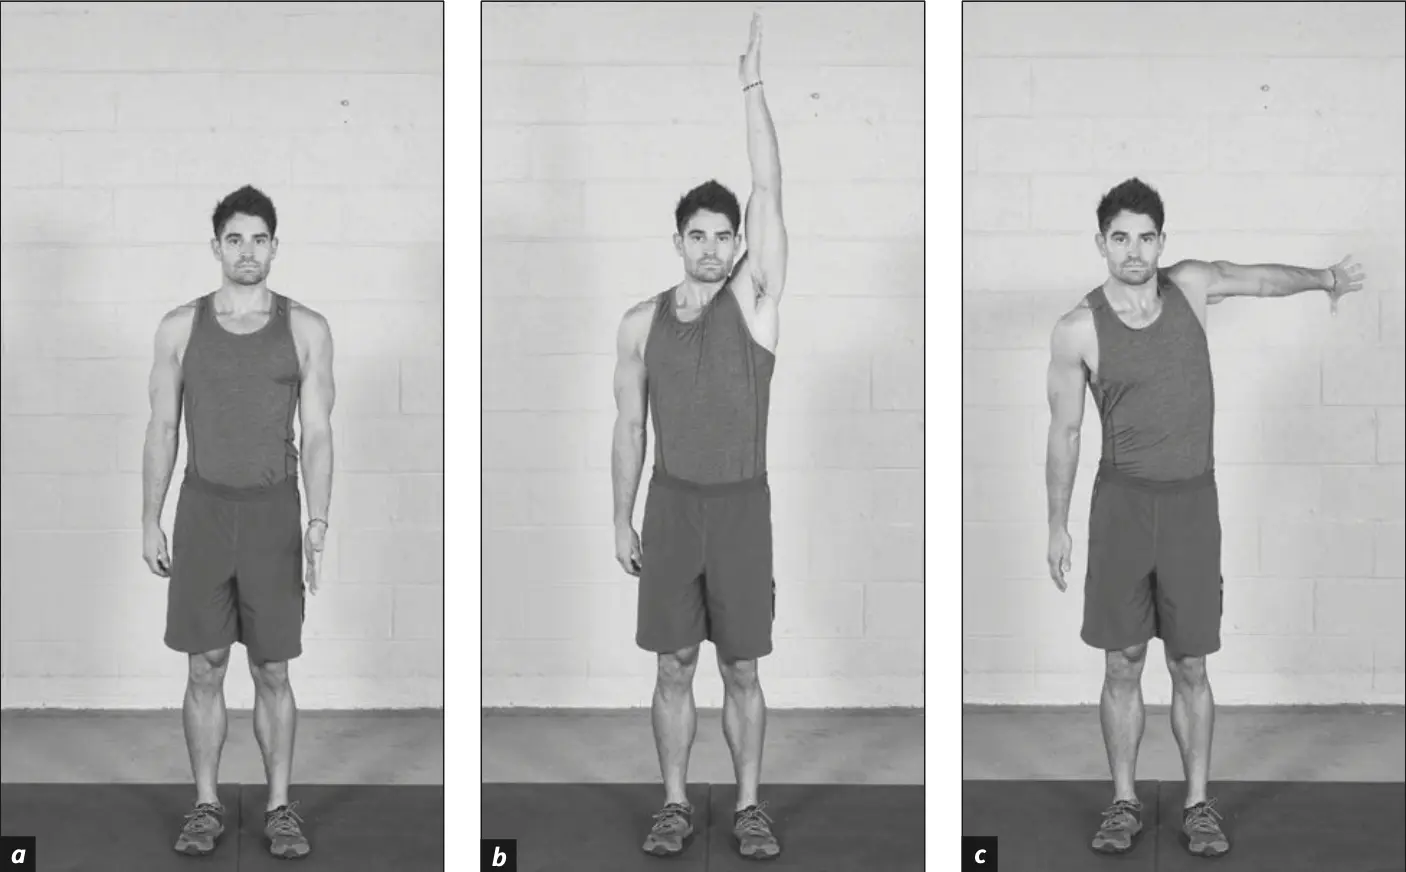
Figure 5.18 Arm twirls.
Stand tall with your elbow straight (see figure 5.18a) and circle your arm up with fingers pointing to the sky (see figure 5.18b). Your biceps should brush your ear with each pass. You may not yet have the flexibility to touch your biceps to your ear, but work toward it over time. Continue to circle your arm down (see figure 5.18c) and let your palm brush your thigh. Continue this twirling movement, gradually going faster and faster, and then move the arm in the opposite direction. Repeat in both directions with the other arm. You may also perform this exercise by moving both arms simultaneously, repeating in both directions.
Chest Hollow and Expand
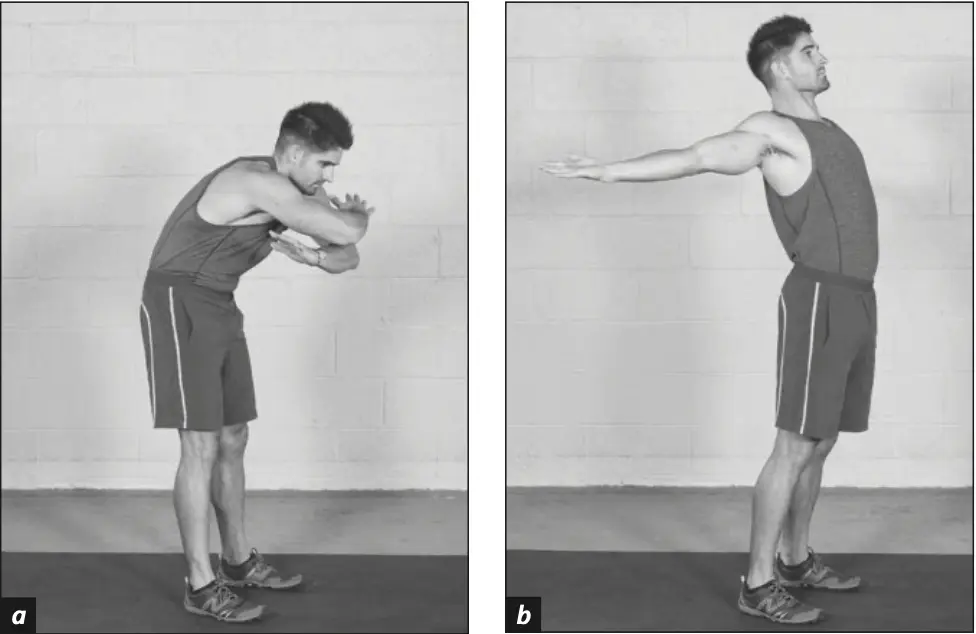
Figure 5.19 Chest hollow and expand.
Stand tall and exhale while hollowing your chest and crossing one arm over the other with palms down (see figure 5.19a). Inhale and separate the arms with palms up as you expand your chest forward (see figure 5.19b). You may also perform this exercise by separating the arms diagonally with one high and one low and repeating in opposite directions.
Vertical Chest Opener
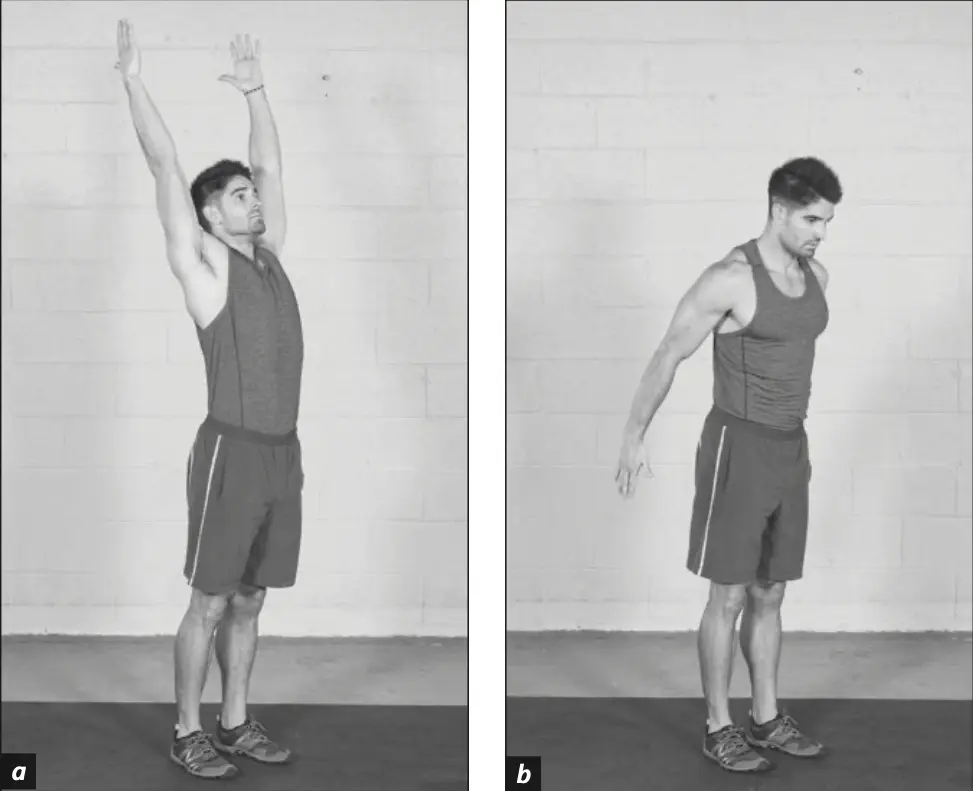
Figure 5.20 Vertical chest opener.
Stand tall and inhale as you swing both arms overhead and open the chest (see figure 5.20a). Exhale and swing both arms down and back (see figure 5.20b).
Dynamic Clapping

Figure 5.21 Dynamic clapping.
Clap your hands in front of you with your arms straight (see figure 5.21a). Swing both arms back and clap the palms together behind you, keeping the arms straight (see figure 5.21b). Try to keep your hands up high and not drop them too much as they move behind you. You will feel this dynamic stretch in the chest, shoulders, and upper-back muscles.
Bootstrappers
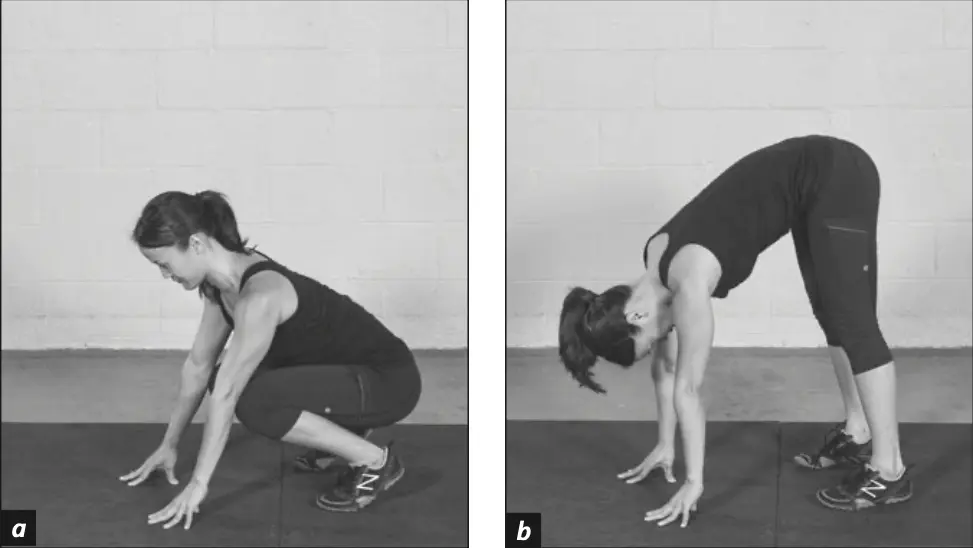
Figure 5.22 bootstrappers.
With feet together, fold forward and place your fingers or palms on the floor. Squat down onto the balls of your feet, keeping your hands on the floor (see figure 5.22a), and push your knees back until they are straight (see figure 5.23b). Repeat this bending and extending of the knees and gradually increase speed as you get warmer. You should feel this stretch in the backs of your legs.
Leg Swings
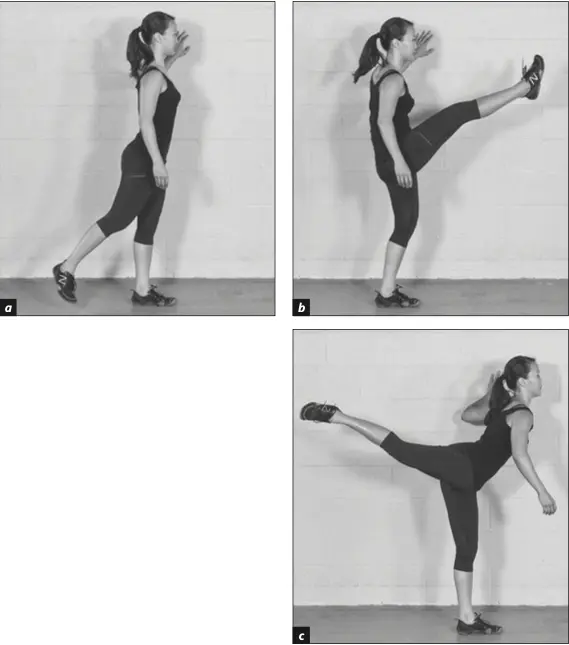
Figure 5.23 Leg Swings.
Balance yourself by gently holding a wall, sturdy chair, or stretching bar and put all your weight on the leg closest to the wall or chair (see figure 5.23a). With the other leg, pull your toes toward you (dorsiflex the foot), and keeping your trunk as upright as possible, swing the leg forward and back (see figure 5.23, b and c), going slightly higher on each rep until you are eventually warm enough to reach maximal height in both directions.
Stage 3 — Sport-Specific Warm-Up
Sport-specific warm-ups involve exercises and drills that mimic the main activity to follow but are performed at a low intensity. The sport-specific warm-up can start with a low-intensity version of the kettlebell lifts to be performed in the main phase — and can be viewed as the transition between the warm-up and main phase.
Stage 4 — Static Stretching Warm-Up
Stretching is not warming up in itself — but it is part of the warm-up. Following your aerobic activity, joint rotations, dynamic mobility exercises, and sport-specific exercises, you should engage in some slow, relaxed, gentle static stretching as the final part of your preparation phase.
This is the most individualized portion of your workout. Static stretches can target specific problem muscles, and your selection may be dictated by past or current injuries and the particular techniques to be performed in the main part of the training session.
- A session with a lot of pressing → spend extra time on the shoulder girdle, chest, and back.
- A tight neck that day → spend a few extra minutes on light neck stretching.
Hold 5–10 Seconds
Gentle Intensity
Save the Long Stretches for the Cool-Down
Behind-the-Back Shoulder Stretch
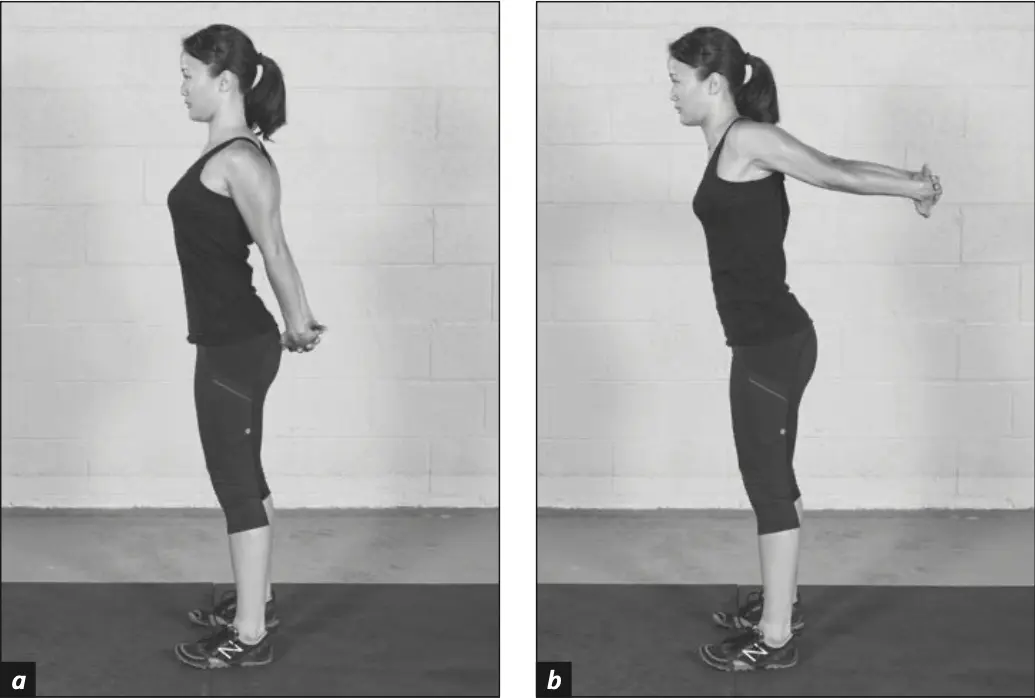
Figure 5.24 Behind-The-Back Shoulder Stretch.
Stand upright and interlock your fingers behind back (see figure 5.24a). Pull your hands upward until you reach your maximum range and hold the position for a few seconds (see figure 5.24b). Relax your arms down again and repeat for 3 to 5 more reps.
Shoulder Stretch
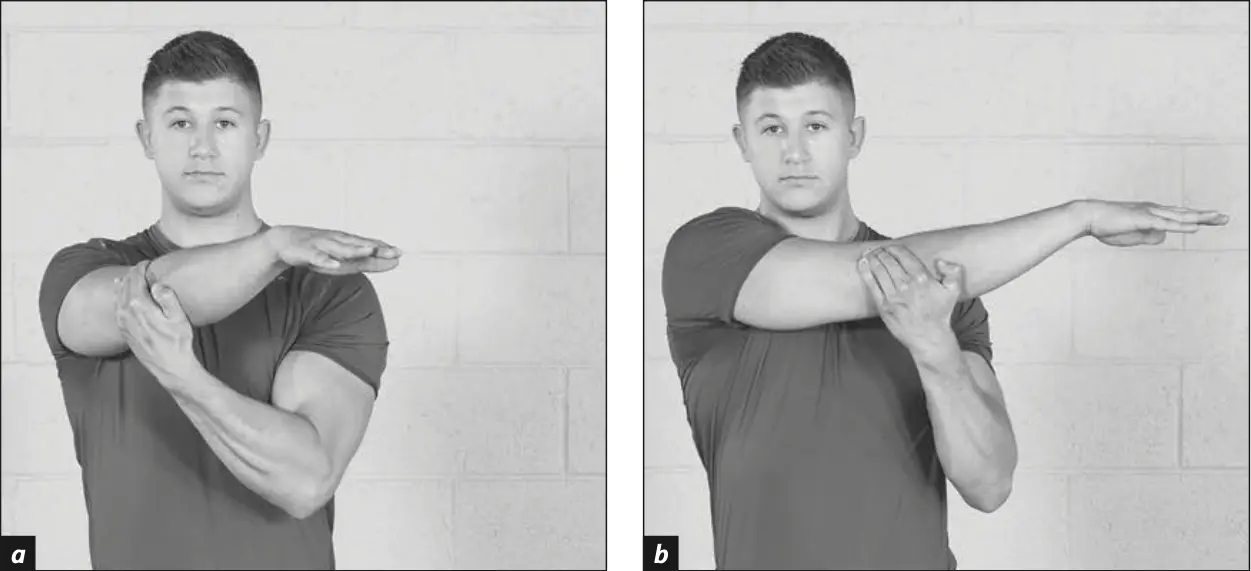
Figure 5.25 Shoulder stretch.
With your elbow extended and palm facing down, reach your arm across the opposite side of your body (see figure 5.25a). With your other hand, reach across and grab your triceps or elbow, and without twisting your trunk, pull firmly on the triceps or elbow until you feel the stretch in the rear part of your shoulder (see figure 5.25b). Hold for 10 to 20 seconds and then repeat with the other arm.
Triceps Pulls
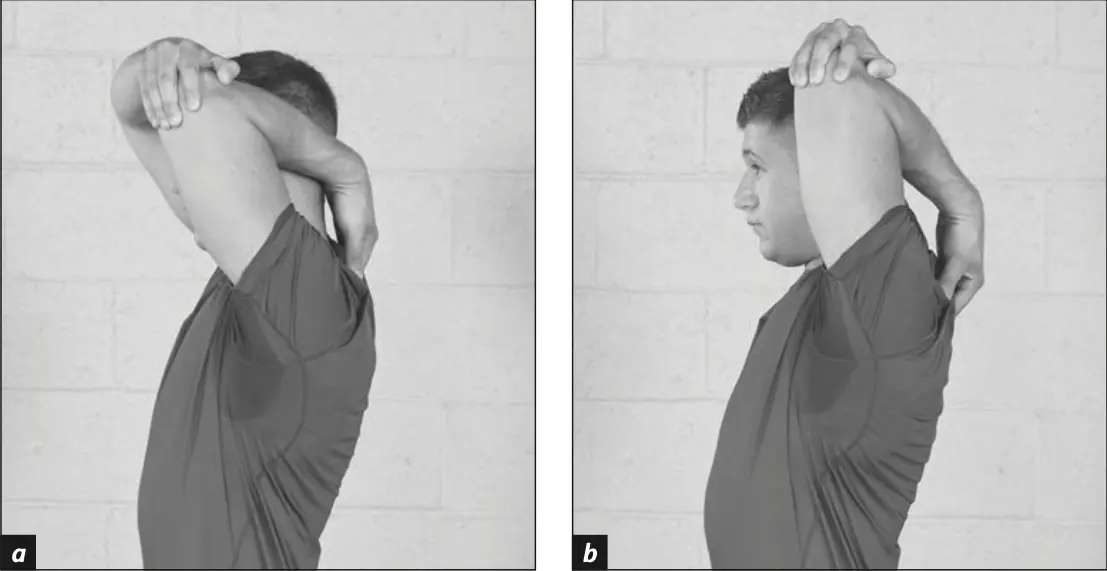
Figure 5.26 Triceps Pulls.
Reach one arm overhead and bend the elbow so that the hand and wrist drop behind your back, the elbow is pointing up to the ceiling, and the fingers are pointing down to the floor. Reach behind your head with your opposite hand and push down on the elbow (see figure 5.26 a and b). Keep your chest lifted and push back with your head against your arm. Hold this position for 10 to 20 seconds, and then repeat with the other arm.
Neck Flexion Stretch
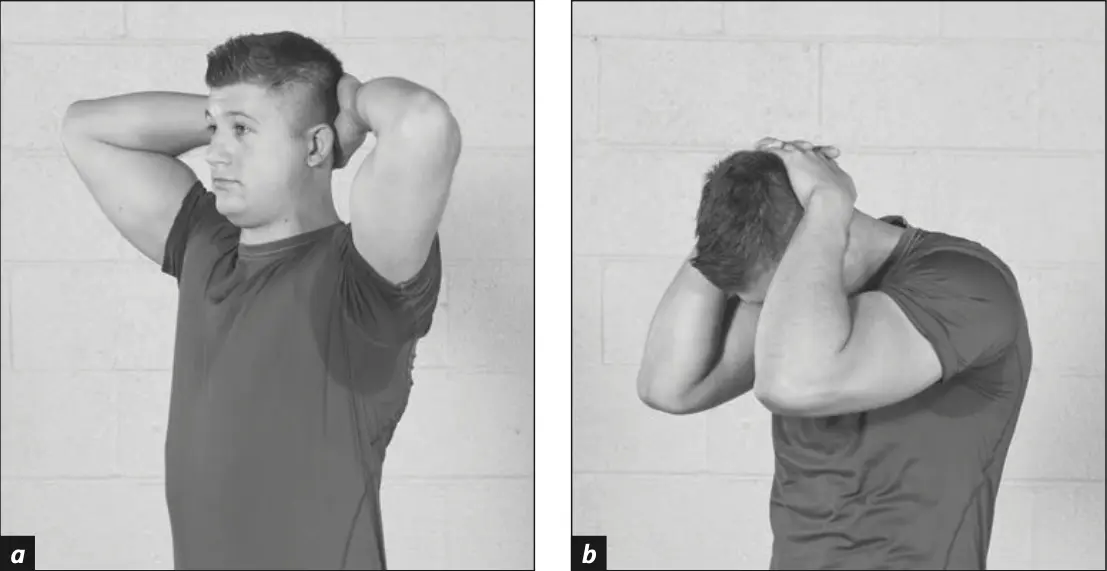
Figure 5.27 Neck Flexion Stretch.
Interlace your fingers and place your hands behind your head (see figure 5.27a). Without bending your trunk, pull down on your head and press your chin to your chest (see figure 5.27b). Feel the stretch in the back of your neck and hold the position for 5 to 10 breaths.
Lateral Neck Stretch
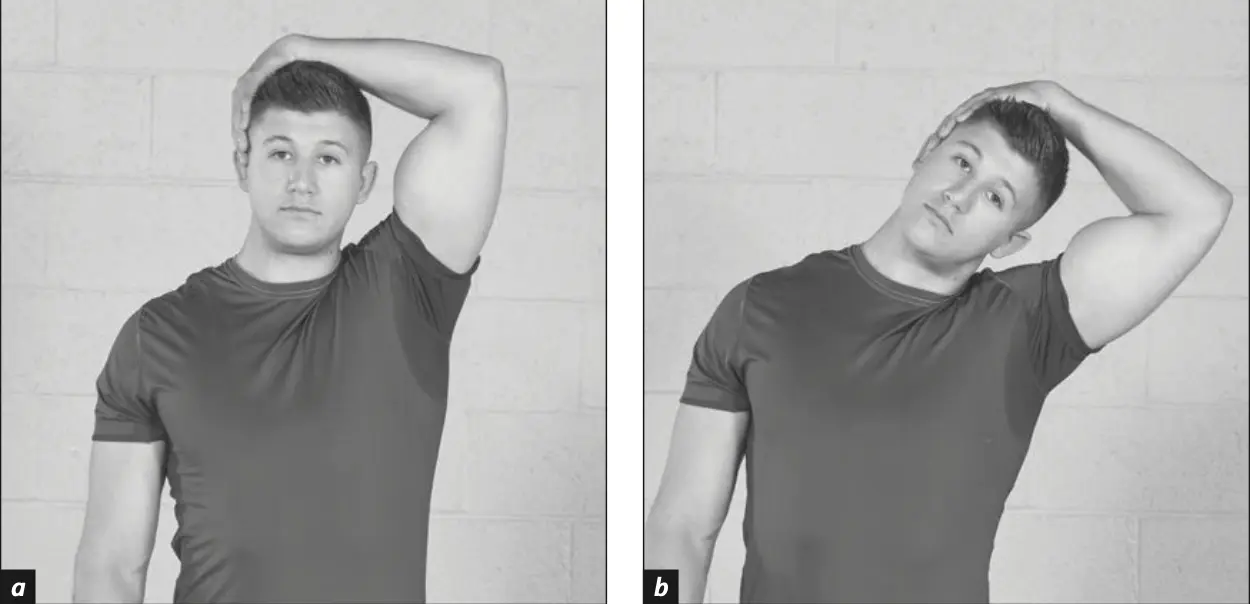
Figure 5.28 Lateral Neck Stretch.
Look forward and reach with your hand up and over to the opposite side of your head (see figure 5.28a), gently pulling your head to the side and bringing your ear closer to the top of your shoulder (see figure 5.28b). Be careful to elongate the side of the neck you are pulling rather than compressing the side moving closer to your shoulder. Hold for 10 seconds and then repeat on the other side.
Standing Knee-to-Chest Stretch
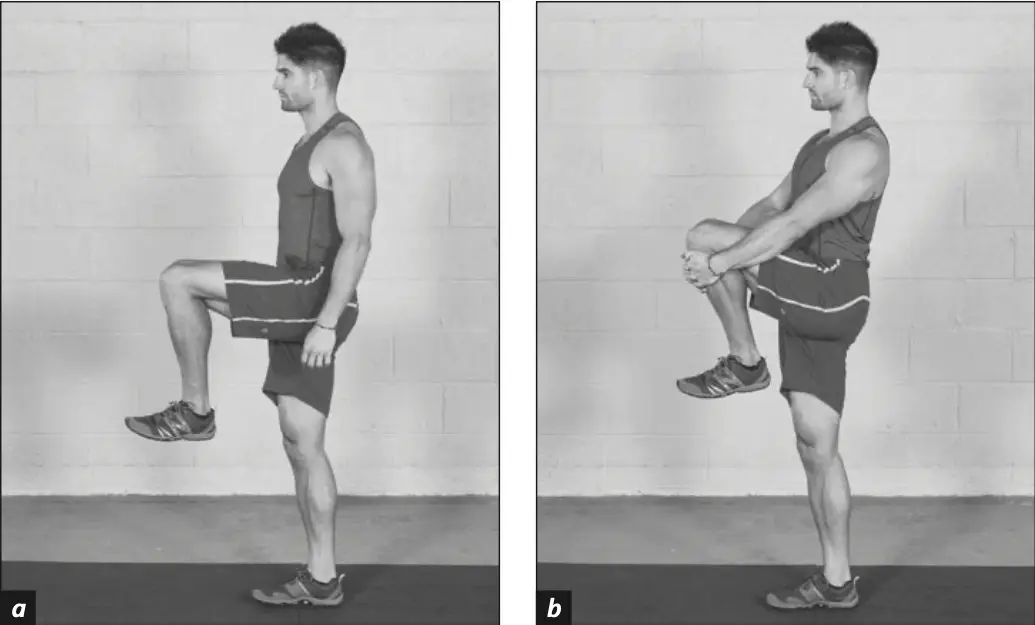
Figure 5.29 Standing Knee-To-Chest Stretch.
Stand upright and lift one knee as high as you can without leaning back (see figure 5.29a). Keep your supporting leg straight, and with interlaced fingers, place your palms on your shin just below knee level and pull your knee to your body (see figure 5.29b). Keep your abdominal muscles tight so that you stay upright and do not lean back. Hold with firm pressure for five breaths and then repeat with the other leg.
Standing Quadriceps Stretch
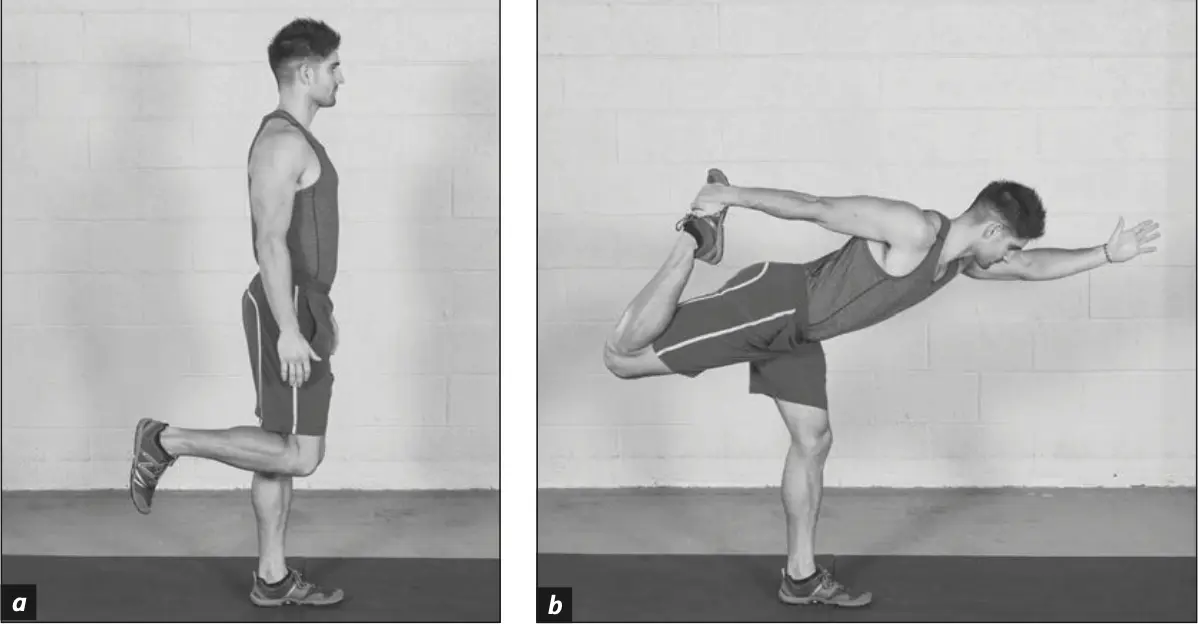
Figure 5.30 Standing Quadriceps Stretch.
Stand upright and bend the right leg behind you (see figure 5.30a). Reach behind to grab your foot or ankle with your right hand and stretch the other arm overhead. Stretch the quadriceps by pulling in firmly and folding forward slightly at the waist (see figure 5.30b). Keep the knee of the stretched leg pointing down to the floor and touching or close to the other leg. The knee on the support leg stays straight. Hold for 10 to 15 seconds and then repeat with the other leg.
Standing Hamstrings Stretch
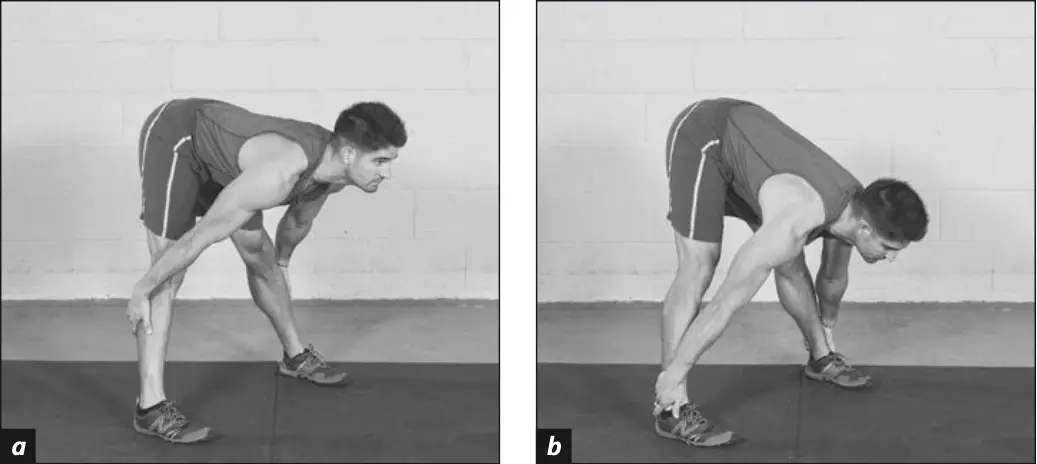
Figure 5.31 Standing Hamstrings Stretch: (a) grabbing the calves if you're less flexible and (b) grabbing the ankles if you're more flexible.
With your legs about hip-width apart, fold forward at the waist while keeping your spine long and not rounded. To keep the spine extended, reach your chin forward while you push your buttocks back. Keep as much distance as you can between your chin and your backside. Keep your knees straight and fold as far forward and down as you can. If you are less flexible, grab the backs of your legs at the calves (see figure 5.31a); if you are more flexible, grab the backs of your ankles (see figure 5.31b). Hold this position for 5 to 10 breaths, pulling firmly with your arms and feeling the stretch in the backs of your legs.
Calf Stretch
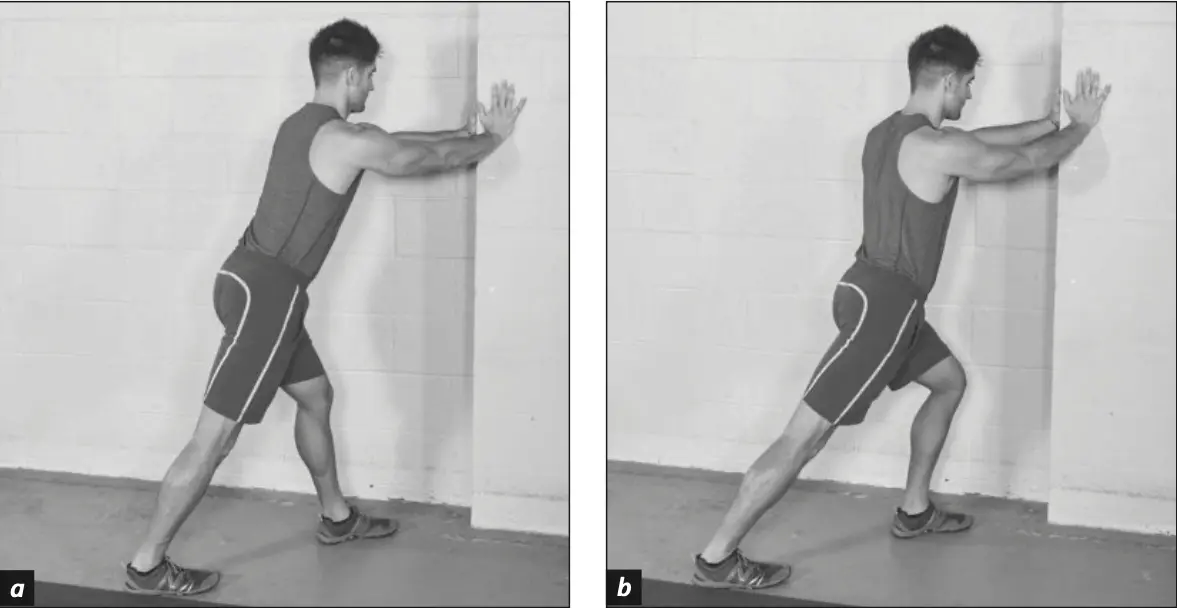
Figure 5.32 Calf Stretch.
Place your hands against the wall with one foot forward and the other foot back and the toes of both feet pointing forward (see figure 5.32a). Shift your weight to the front leg by bending the front knee until the rear knee is extended straight (see figure 5.32b). Feel the stretch in the back of your rear leg. Stretch deeper by pressing the rear heel firmly into the floor and shifting more weight onto the front leg. You will have to play with the distance between your feet until you find the distance that gives you the best stretch. Hold for 15 to 20 seconds and repeat with the other leg.
Spinal Flexion
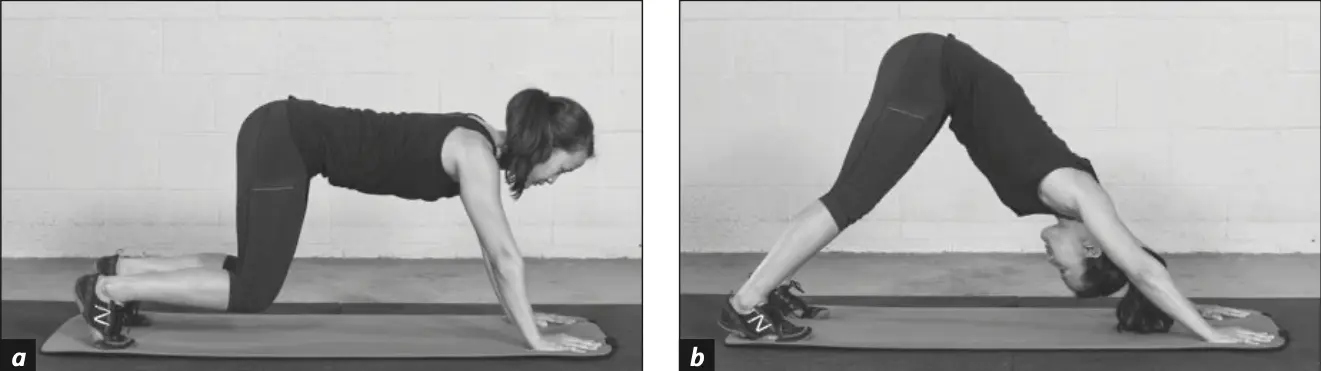
Figure 5.33 Spinal Flexion.
Place your hands and feet on the floor with your knees straight and hips pushing up and back (see figure 5.33a). Use firm pressure from your palms to continue pushing your hips as far back as possible and drop your head so that you are looking down and between your feet (see figure 5.33b). If your knees are bent, come up onto the balls of your feet and press your knees back until your legs are straight. Over time as you become more flexible in this position, drop your heels to the floor while keeping your legs extended. Hold this position for 5 to 10 breath cycles.
Spinal Extension
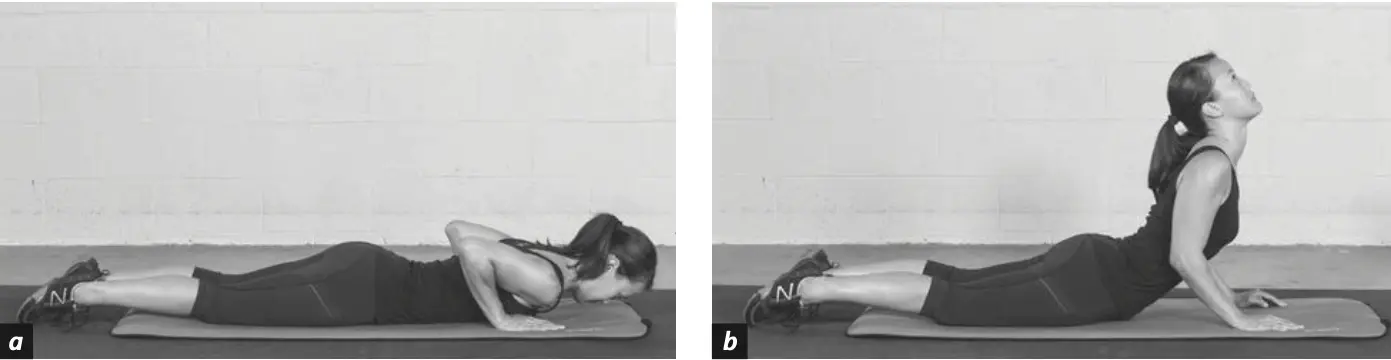
Figure 5.34 Spinal Extension.
Lie on your belly with your palms flat on the floor slightly wider than shoulder-width apart and your feet together (see figure 5.34a). Press your feet away from you, trying to make your lower spine as long as possible. Inhale and look up, and while pressing into the floor with your palms, lift your upper body off the floor while keeping your hips pressed into the floor (see figure 5.34b). Your chest is lifted and your shoulders are pressed down, not shrugged. Hold this position for five breath cycles (a cycle is one inhalation and one exhalation). You will feel the stretch along both sides of your spine. You can also perform this exercise with a twist: at the top of the stretch, twist your upper body to one side and hold that position for three breath cycles, and then twist the other direction. Repeat to the right and left another two or three times.
Knee-to-Chest Stretch
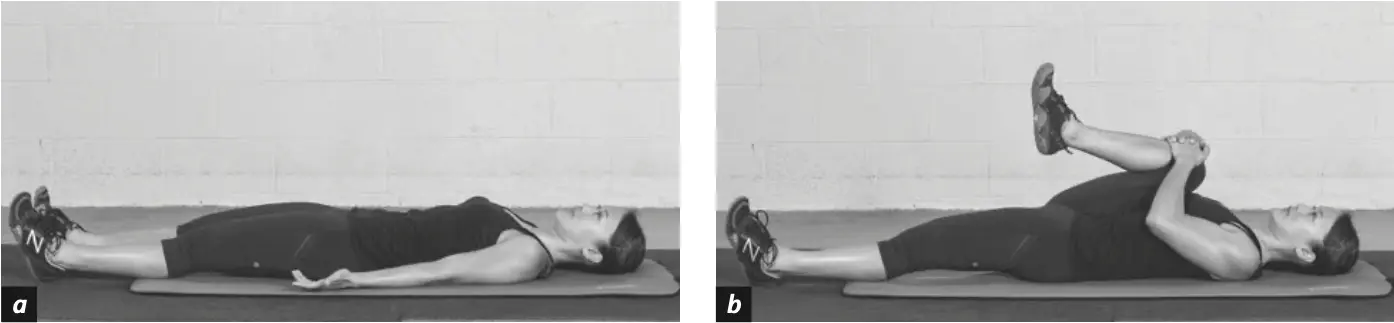
Figure 5.35 Knee-To-Chest Stretch.
Lie on your back with both legs extended (see figure 5.35a). Bend one leg, and with interlaced fingers, grab just below your knee and pull the knee firmly to your chest (see figure 5.35b). Hold that position for 5 to 10 seconds and then extend the leg back to the floor and repeat the stretch with the other leg. You should feel this stretch somewhat in your hips but primarily in your lower back. Repeat with both legs another three or four times.
Child's Pose
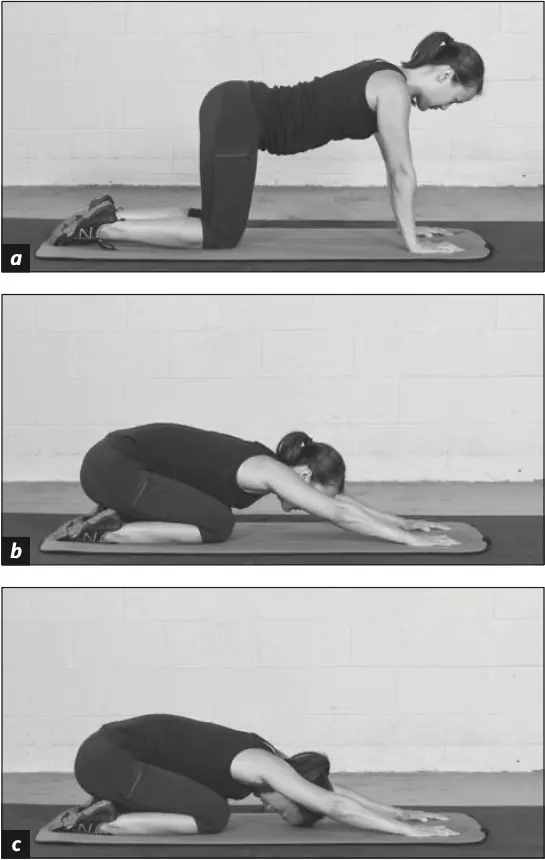
Figure 5.36 Child's Pose.
Begin on your hands and knees (see figure 5.36a). Press your hands and fingers firmly into the floor and use strength from your hands to push your hips back as far as you can while dropping your hips to just above or onto your ankles (see figure 5.36b). Drop your head to the floor and try to elongate your spine as much as you can (see figure 5.36c). Hold this position for 10 breath cycles.
Ready for the Main Phase
Warming Up and Cooling Down
Why a complete kettlebell training session has three phases — warm-up, main workout, and cool-down — and how each one protects your body and improves performance.
Final Phase: Cool-Down
How to recover after kettlebell training — the role of the cool-down, the three-part sequence of sport-specific activity, dynamic stretching, and static stretching.