Basic Kettlebell Exercises
Basic Kettlebell Exercises
How to Approach These Exercises
Introductory Kettlebell Moves
Before swinging, cleaning, or pressing your kettlebell, you'll want to get comfortable handling it and moving it from one hand to another to develop confidence and control. The following movements are a safe and simple introduction to the tool, as well as a helpful low-intensity warm-up before the more vigorous kettlebell exercises.
The idea is to get comfortable handling your kettlebell — picking it up, placing it down, and moving it around the body and from hand to hand. All skills you will use in the exercises that follow.
Around-The-Body Pass
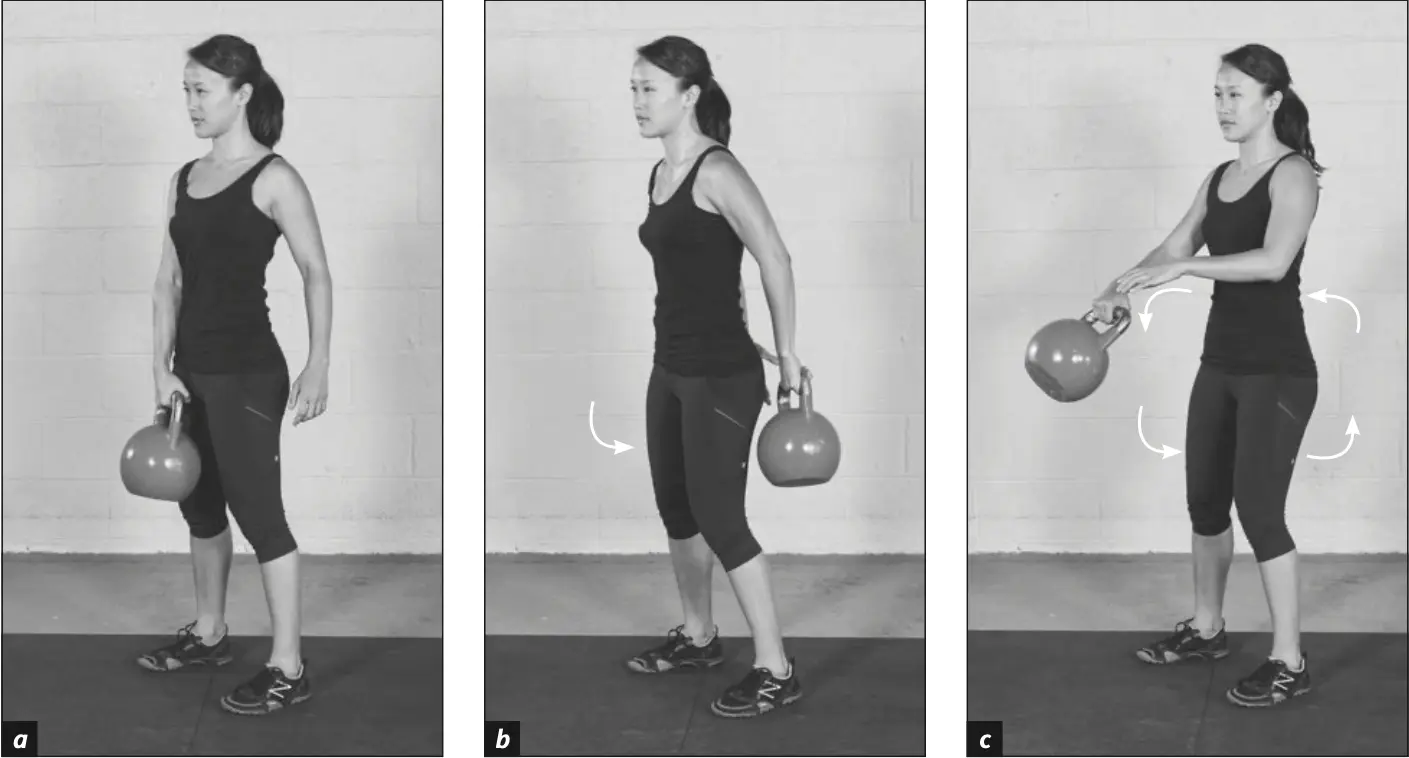
Figure 6.5 Around-the-body pass.
The around-the-body pass serves as an excellent warm-up, especially for the arms, core, and grip. Maintain good posture and alignment as you pass the kettlebell around the body while your hips remain facing forward throughout (see figure 6.5). Breathe normally throughout the exercise. Vary the tempo and reverse directions several times.
Key Principles
- Keep your eyes forward to maintain good posture and develop kinesthetic awareness.
- Ensure the kettlebell is close to the body but not so close as to create collision and injury.
Halo
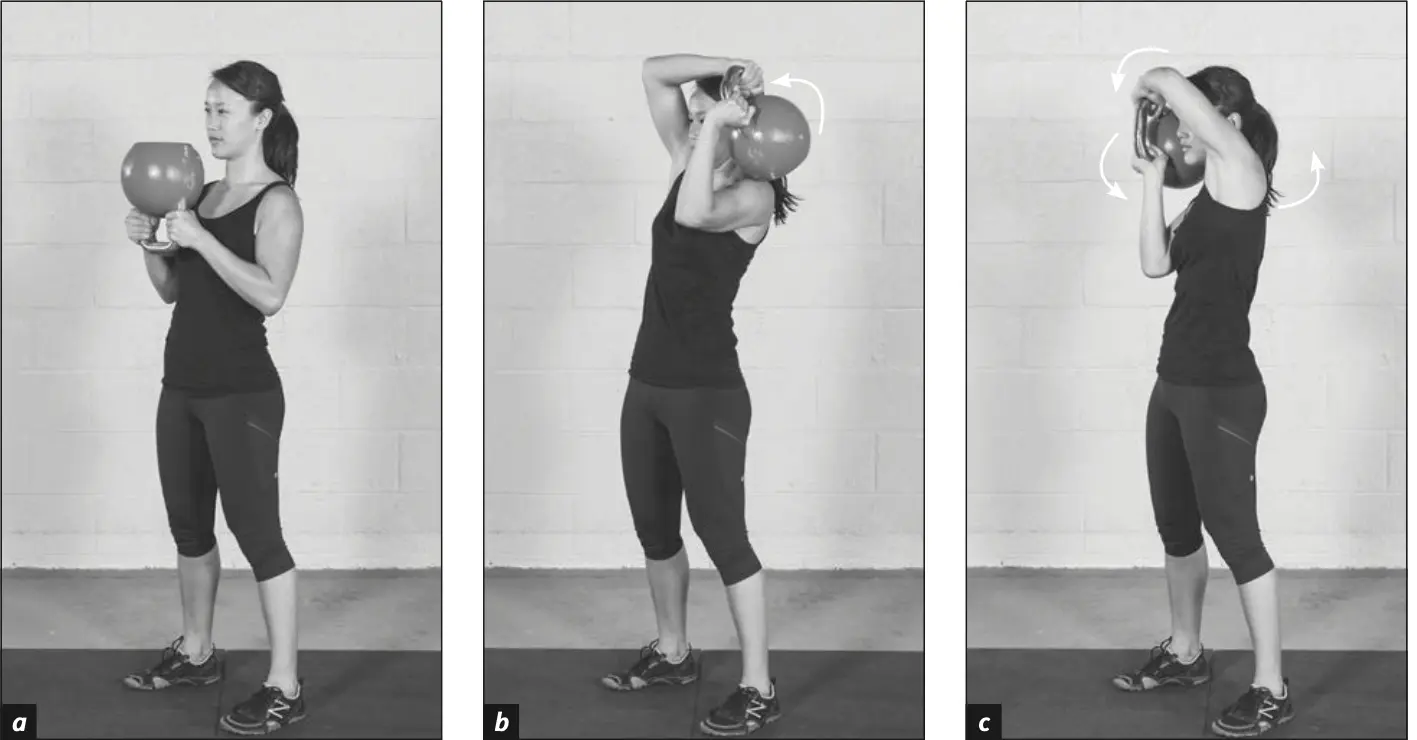
Figure 6.6 Halo.
The halo is a phenomenal exercise for shoulder and cervical mobility. Many people love the way it makes the shoulders feel and incorporate it into their warm-up, rehabilitation, and prerehabilitation routines.
Hold a light kettlebell by the horns (the sides of the handle) in front of your face using both hands (see figure 6.6a). Circle over and across the top of the head and continue all the way around (see figure 6.6, b and c). The kettlebell drops lower as it comes behind you and rises again as it moves back up in front. Breathe normally throughout, and work in both directions.
Key Principles
- As the name suggests, keep the path of the kettlebell comparable to a halo around the top of your forehead.
- Relax the elbows and allow them to articulate freely.
- Ensure the kettlebell is close to the head, but use caution to avoid accidental contact with the upper extremities.
Figure-Eight Between-The-Legs Pass
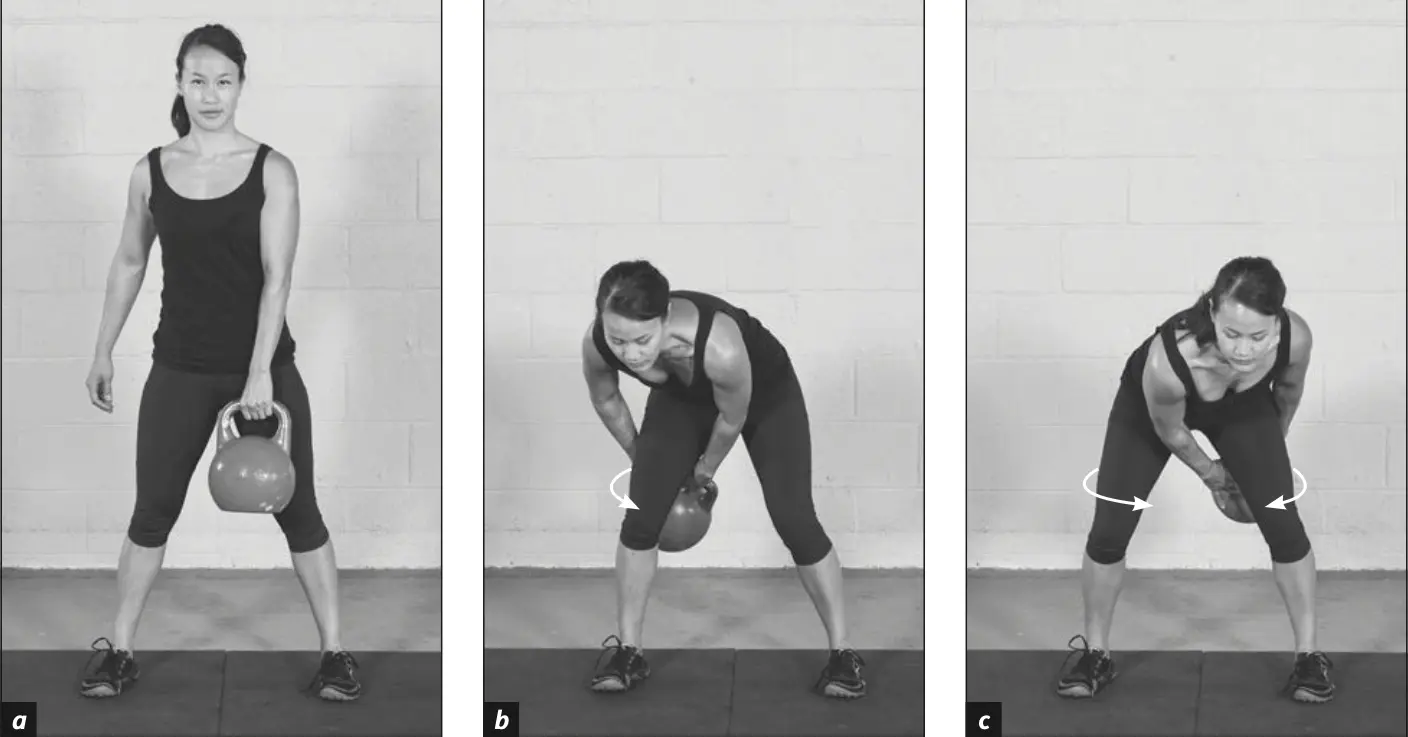
Figure 6.7 Figure-eight between-the-legs pass.
This is a gentle warm-up and a surprisingly good conditioning movement for the legs and core. It involves elements of coordination and body awareness, which makes it challenging and engaging.
Pick up the kettlebell and hold it in front of you with either hand, with feet shoulder-width apart and a slight bend in the knees (see figure 6.7a). Pass the kettlebell from the left hand to the right through your legs from front to back (see figure 6.7b). Continue the momentum to circle back in front of the body and pass to the other hand (see figure 6.7c).
Exhale as you switch hands. This will automatically create an inhalation at the other movement points. Continue this continuous figure-eight pattern, then change direction and pass from back to front.
Key Principles
- As you pass the kettlebell between the legs, maintain a neutral spine and a crease in the hips.
- Keep the kettlebell close to the body, being careful not to hit yourself with it.
Box Squat
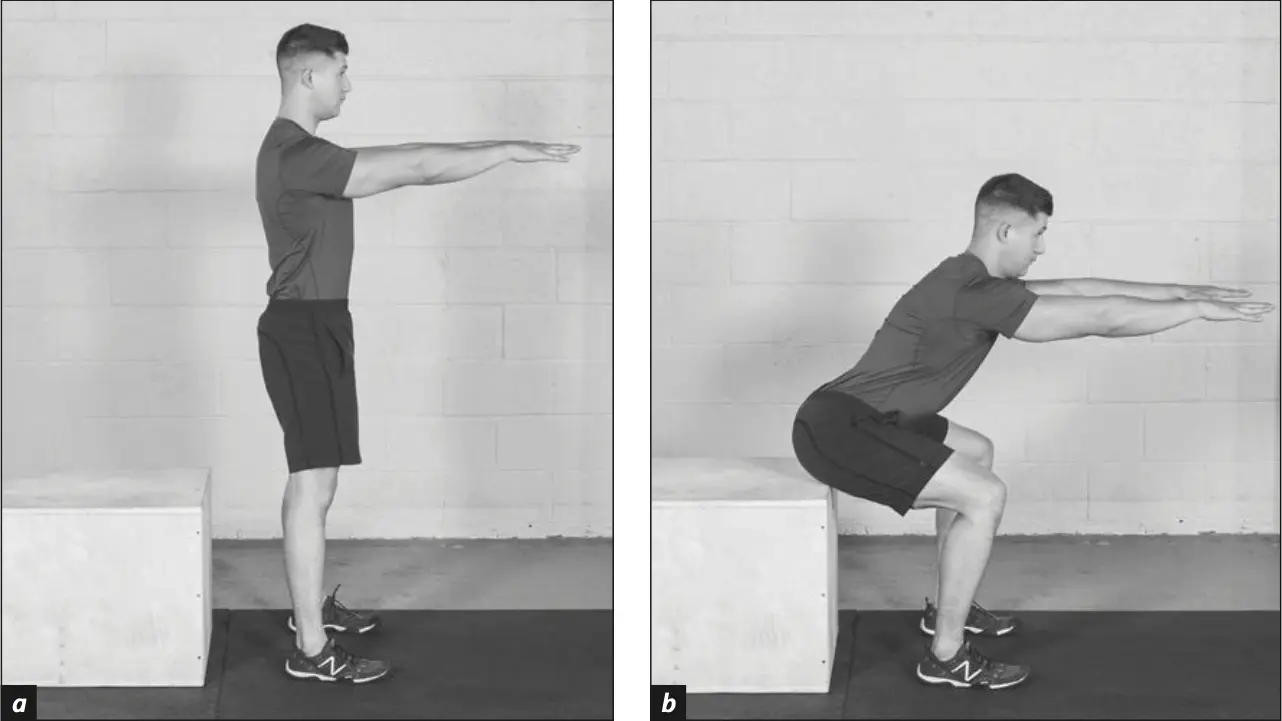
Figure 6.8 box squat.
The box squat helps you become familiar with proper squat mechanics while simultaneously providing a degree of safety and structural support in the bottom position. This version teaches proper hip action — how to sit back and load your hips while keeping tension in them.
Stand in front of a sturdy box or chair with feet shoulder-width apart or slightly wider (see figure 6.8a). Lower to touch your buttocks and upper hamstrings to the top of the box without actually sitting on it, keeping your weight on your heels and full control of your body (see figure 6.8b). Inhale as you descend and exhale as you stand up. When done correctly, you will properly engage your hips and make your squat less of a knee-dominant movement.
Key Principles
- Do not collapse on the box — it is only a focal point to reach for.
- Use the paradoxical breathing technique (inhale as you descend, exhale as you stand). As you become comfortable and feel your spinal stability improve, you can switch to anatomical breathing (exhale as you descend, inhale as you stand up).
- Maintaining a neutral spine (slightly arched lower back) along with creased hips is the key to both performance and injury prevention.
This occurs frequently and must be avoided because it can lead to ACL tears. It typically is not a knee issue but rather a lack of hip activation.
To help avoid this, press the knees out to the sides as you lower into the squat. You can also place a 20 in. (51 cm) piece of tubing or a light band around the outside of the knees — this will train you to avoid the knee collapse.
Kettlebell Deadlift
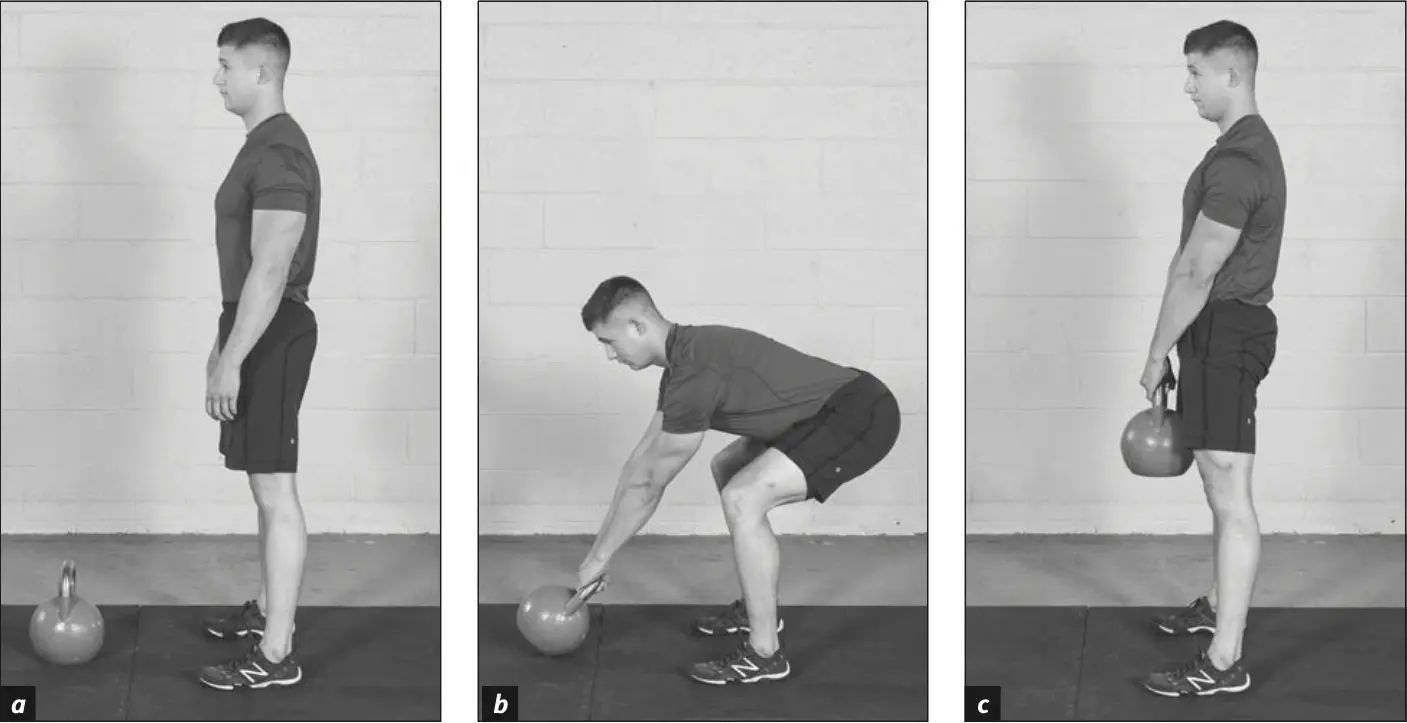
Figure 6.9 Kettlebell deadlift.
The kettlebell deadlift primarily targets the posterior chain — lower back, glutes, and hamstrings. It is an excellent companion to the kettlebell box squat and helps teach proper hip-creasing mechanics, creating an important foundation for the classical kettlebell exercises (swing, clean, snatch).
With the kettlebell on the ground, stand with your feet shoulder-width apart with the kettlebell just in front of you (see figure 6.9a). Keep your chest lifted as you sit back with your hips until your hands can reach the handle (see figure 6.9b). Grab the handle with both hands and stand up by pressing your feet into the ground until your body is fully upright (see figure 6.9c). Repeat by sitting back to lightly touch the kettlebell to the ground.
- Women — start with 8 kg (18 lb) for 10 reps, then move to 12 kg (26 lb) for 10 reps.
- Men — start with 16 kg (35 lb) for 10 reps, then move to 24 kg (53 lb) for 10 reps.
This basic exercise teaches you to keep your center of gravity aligned vertically over your base of support. It is important to have control over your center of mass because kettlebell training involves dynamic movements. A strong and stable base will keep you safe when swinging the kettlebell.
Key Principles
- Crease at the hips instead of bending at the waist.
- Maintain a neutral spine and slightly arched lower back.
- Legs can be bent or straight depending on the desired training effect — straight legs recruit the hamstrings more, bent legs recruit the quadriceps more.
Classical Kettlebell Lifts
Once you have become familiar with a proper warm-up and the introductory kettlebell movements, it's time to learn the classical kettlebell lifts.
The classical lifts are the foundational exercises that introduce the mechanical standards and principles used throughout all other kettlebell exercises. Special attention should be paid to smoothly and accurately practicing these — correct execution sets the foundation for developing fitness safely and effectively.
Single Swing
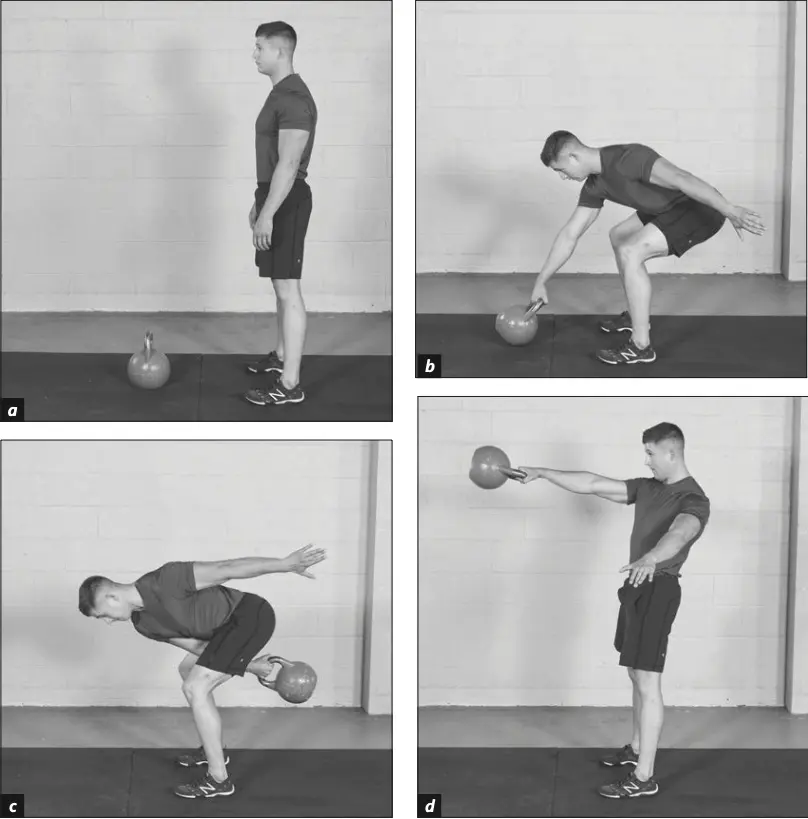
Figure 6.10 Single swing.
The single swing is the foundational movement of all the classical lifts. Within this exercise, you'll find many of the universal principles and unique aspects of kettlebell training — inertia, pendulum grip endurance, and anatomical breathing.
How to Perform
Stand with the feet hip-width apart and with one kettlebell on the floor in front of you (see figure 6.10a). Sit back with the hips (think box squat) and with one hand, grab the handle with the fingers (see figure 6.10b).
Thumb Position Options
Thumb positioning for the swing can vary depending on the individual and the training goals. There are three options:
Thumb Forward
Thumb Back
Neutral Thumb
Completing the Swing
Keep the shoulders back and chest lifted as if you are going to do a deadlift, and as you begin to stand, swing the kettlebell between your legs (see figure 6.10c). When the swing reaches its end point behind you, stand up completely, extending the ankles, knees, hips, and torso (see figure 6.10d). Sustain this pendulum swing through the duration of the set.
Breathing
Use one or two cycles of anatomical breathing (a cycle is one exhalation and one inhalation):
- One-cycle variation — exhale at the back of the downswing, inhale during the upswing.
- Two-cycle variation — exhale at the back of the downswing, inhale, exhale as the kettlebell transitions from the horizontal to the vertical plane at the top of the forward swing, and inhale as the kettlebell drops again preceding the next backswing.
Key Principles
- The pendulum is a perfect analogy — it relies on mechanical energy conservation to sustain the movement indefinitely. This momentum-based approach allows for greater work capacity, less stress on the lower back, and efficient deceleration of the bell during the downswing.
- Maximize the connection between the arm and torso on the upswing for optimal power transfer from the lower body to the kettlebell.
- Relax the arm completely — visualize it as a rope that starts at the base of the neck and ends at the fingertips.
- Deflect back via the hips at the top of the upswing to counterbalance the weight in front of the body and as a catalyst to complete hip extension. Maintain deflection as you drop the kettlebell into the downswing until you feel the triceps come into contact with the rib cage. At that point, softly absorb the downward force with a slight bend of the knees and ankles, then crease the hips into the pendulum spring mechanics.
Single Clean
The single clean is a natural progression from the swing and is the intermediary point between the swing and many of the overhead lifts. It introduces hand insertion, alignment points connected to the rack position, and positioning of the kettlebell in the hand to avoid injury and grip fatigue. It also teaches you how to use your legs to transmit vertical power from the lower to upper body.
With practice, your clean becomes a smooth, rhythmic movement that you can sustain for extended lengths of time — although it may take hundreds of practice reps before it flows and becomes polished.
How to Perform
With the kettlebell on the floor, sit back with your hips and grip with the handle with the fingers of one hand (see figure 6.11a and b). Swing the kettlebell back through your legs as you did in the one-handed swing (see figure 6.11c) and as it swings forward, keep your forearm braced against your body (see figure 6.11d).
During the swing, your arm comes away from the body as inertia pulls the kettlebell forward and up. During the clean, the arm does not disconnect from the body — at the point where the arm would disconnect during the swing, it instead moves vertically along the front of your body.
When the hips reach forward extension, pull with the hip on the working side and give a gentle tug with your trapezius on the same side, pulling the kettlebell up the chimney (see figure 6.11e).
Before the kettlebell settles to the chest, loosen your grip and open your hand to insert your fingers as deeply into the handle as you can at a curved angle until the medial portion of your forearm — the ulna — blocks you from inserting the hand any further (see figure 6.11f). Complete the vertical pull by letting the kettlebell rest on your chest and arm (see figure 6.11g) into what is called the rack position. This is the top position of the clean.
Rack Position Alignment
Medial to the Lateral Shoulder
The Triangle Tip
The Drop
Now complete the lift by turning your palm faceup and deflecting the force by moving the shoulders back (see figure 6.11h). Remember you are standing inside a chimney, so the kettlebell can only move down, not forward. Your elbow stays braced to your body. As the kettlebell is falling, just before the elbow reaches full extension, pull the hand back to catch with the fingers, then tighten the grip to complete the backswing (see figure 6.11i).
As in the swing, you can use any of the three thumb positions in the bottom portion of the clean — thumb forward, thumb backward, or neutral thumb. Continue this smooth pendulum motion throughout the set.
Breathing
Use anatomical breathing with three or more breathing cycles. Starting from the rack position:
Inhale and deflect back
Drop the kettlebell into the downswing.
Exhale at the back of the downswing
Inhale during the transition
Into the forward swing.
Exhale at completion of the forward swing
Inhale with hand insertion
Exhale as the kettlebell lands in the rack position
This equals three breath cycles. During a long set, or anytime you are very tired, take additional recovery breaths while the kettlebell is resting in the rack position.
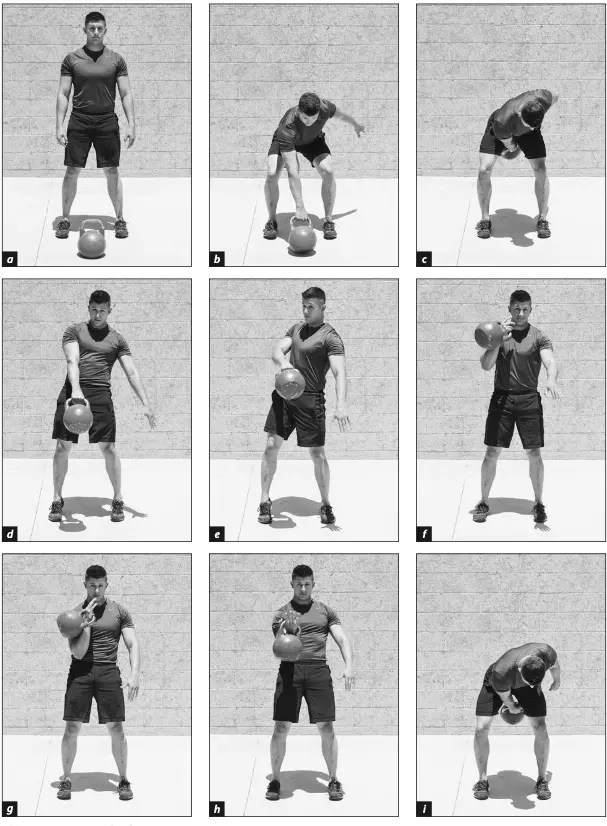
Figure 6.11 Single clean. (continued)
Key Principles
- Begin hand insertion at approximately hip level and ensure that the angle of the hand as it begins insertion is 45 degrees. Hand insertion is also used in the snatch and many other lifts. The starting and ending of each rep use the same hand position as the swing — the hand moves in and out of the kettlebell during the up and down phases.
- Experiment with thumb positions to find the configuration that feels most comfortable for you.
You are most likely inserting your hand too early, too late, or at an incorrect angle. Use a hand-insertion drill where you visualize a ladder with four rungs in front of you on the vertical plane. Gradually climb the ladder, inserting your hand with a claw grip:
- Rung 1 — chest level
- Rung 2 — face level
- Rung 3 — just over your head
- Rung 4 — near the top, just before your arm reaches full extension
Clean up and release the fingers to insert the hand at each level, then drop down into the backswing between each insertion.
Drills for the Rack Position
The rack position — where the kettlebell rests against your forearm and chest — is one of the most important skills of kettlebell training, and one of the most difficult to master. Lack of flexibility is usually the main limitation to learning the proper position. Here are some useful flexibility drills for improving the rack.
Rack Hold
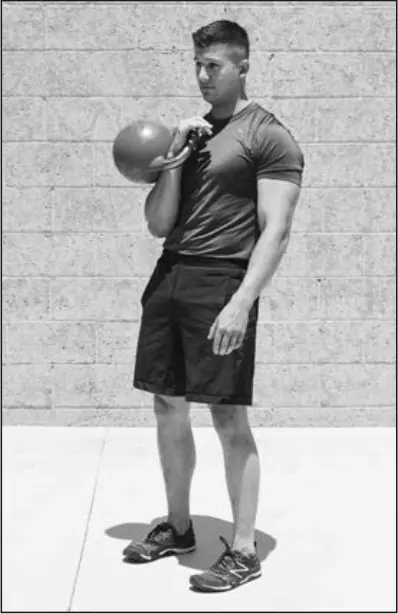
Figure 6.12 Rack Hold.
Stand with a kettlebell on the chest, hand inserted fully into the handle, forearm resting on the body, legs fully extended, and the kettlebell vertically aligned over the foot on the same side (see figure 6.12). Hold this static position for 1 minute and work up to 3 minutes before moving up to a heavier kettlebell — this targets key areas of the shoulders, spine, and hips.
Wall Push
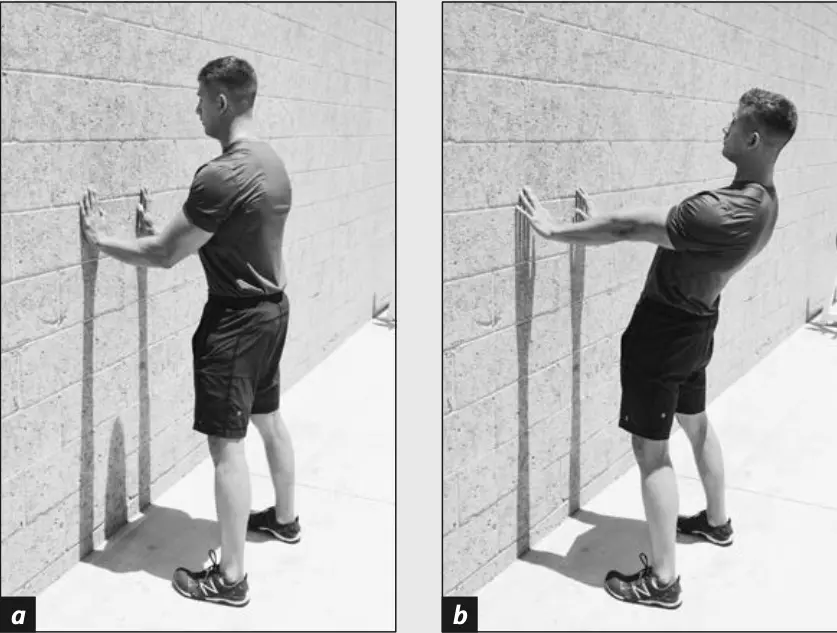
Figure 6.13 Wall push.
Stand in front of a wall with your palms flat against the wall and elbows bent and touching your ribs (see figure 6.13a). Without moving your feet, push against the wall with your palms. Because the wall will not move, your body has to move back without moving the feet or the hands. Keep pushing until your elbows are fully extended (see figure 6.13b).
Your shoulders will end up behind your hips, and you will feel a nice stretch in your lower back. To increase the challenge, move your feet closer to the wall and repeat the drill.
Bridging
For the bridging progressions, start with the most basic and work slowly into the progressions. Never force range of motion, and always pay attention to breathing — never holding your breath. The more you can relax your mind and breathing, the easier your muscles will relax and enable you to assume the positions.
Basic Bridging
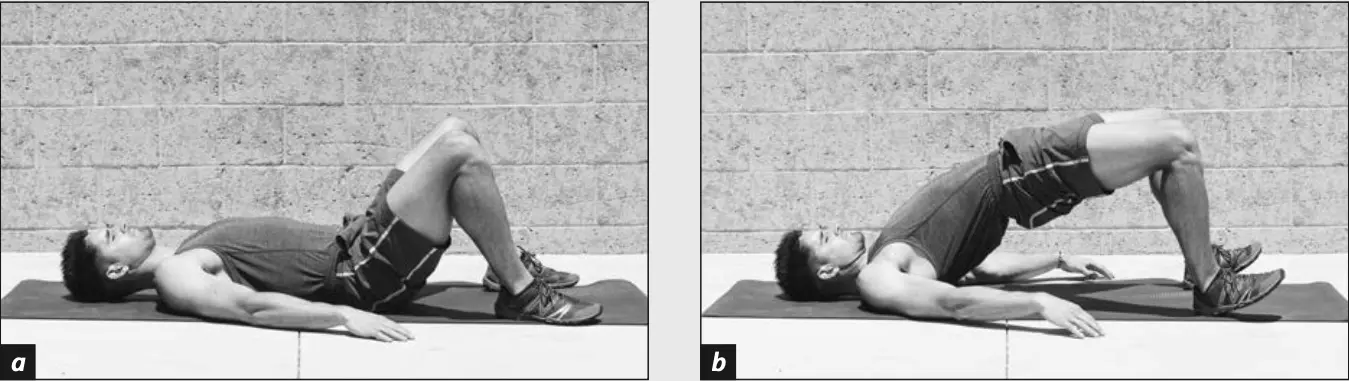
Figure 6.14 Basic Bridging.
Lie flat on your back with your feet flat and knees bent (see figure 6.14a). Press your heels through the floor and lift your pelvis as high off the ground as you can (see figure 6.14b). Keep your shoulders and head flat on the floor. Hold the position for 30 to 60 seconds.
Intermediate Bridging

Figure 6.15 Intermediate bridging.
Place your palms flat on the floor with your elbows pointing up toward the ceiling (see figure 6.15a). You will need sufficient flexibility in the shoulders to comfortably place the hands. Press up with your hands and feet and place the top of your head on the floor (see figure 6.15b). Use your head, hands, and feet as wedges and press firmly, lifting your pelvis as high as possible (see figure 6.15c). Progress to 30- to 60-second holds.
Advanced Bridging
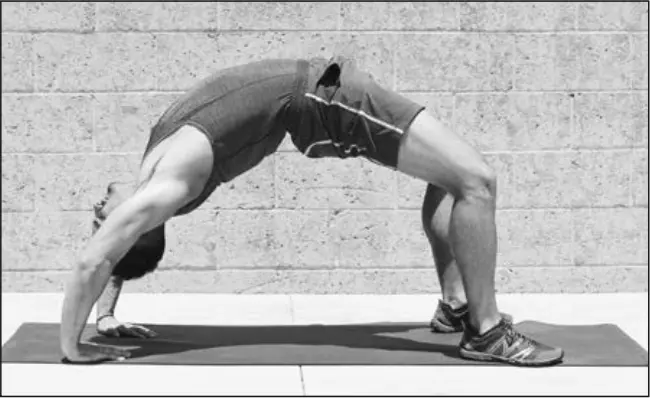
Figure 6.16 Advanced bridging.
From the intermediate bridge position, lift your head off the floor and extend your arms fully. Use your legs to press your body back as you lift your chest and straighten your elbows (see figure 6.16). You need excellent flexibility of the spine, hip flexors, shoulders, and chest to get into a correct bridge — and this will help you greatly in finding a comfortable rack position.
Hanging From Bar
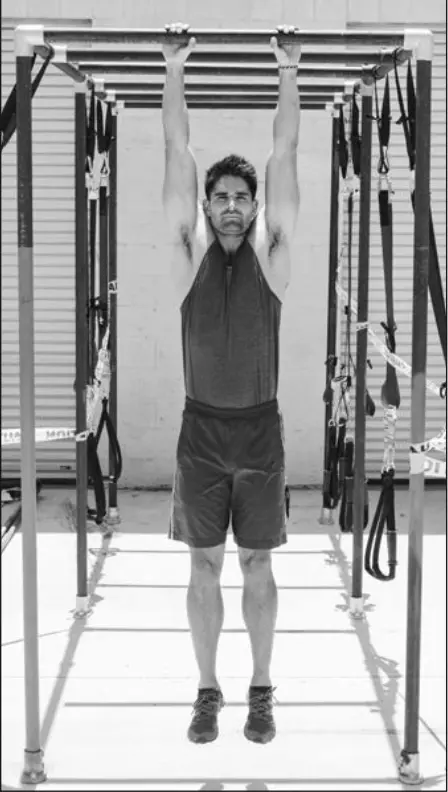
Figure 6.17 Hanging From Bar.
With hands shoulder-width apart or closer, grab a pull-up bar and hang, allowing the body to completely relax (see figure 6.17). Hold for 15 seconds or longer and feel the chest, shoulders, and upper back lengthening.
Yoga Eagle Stretch
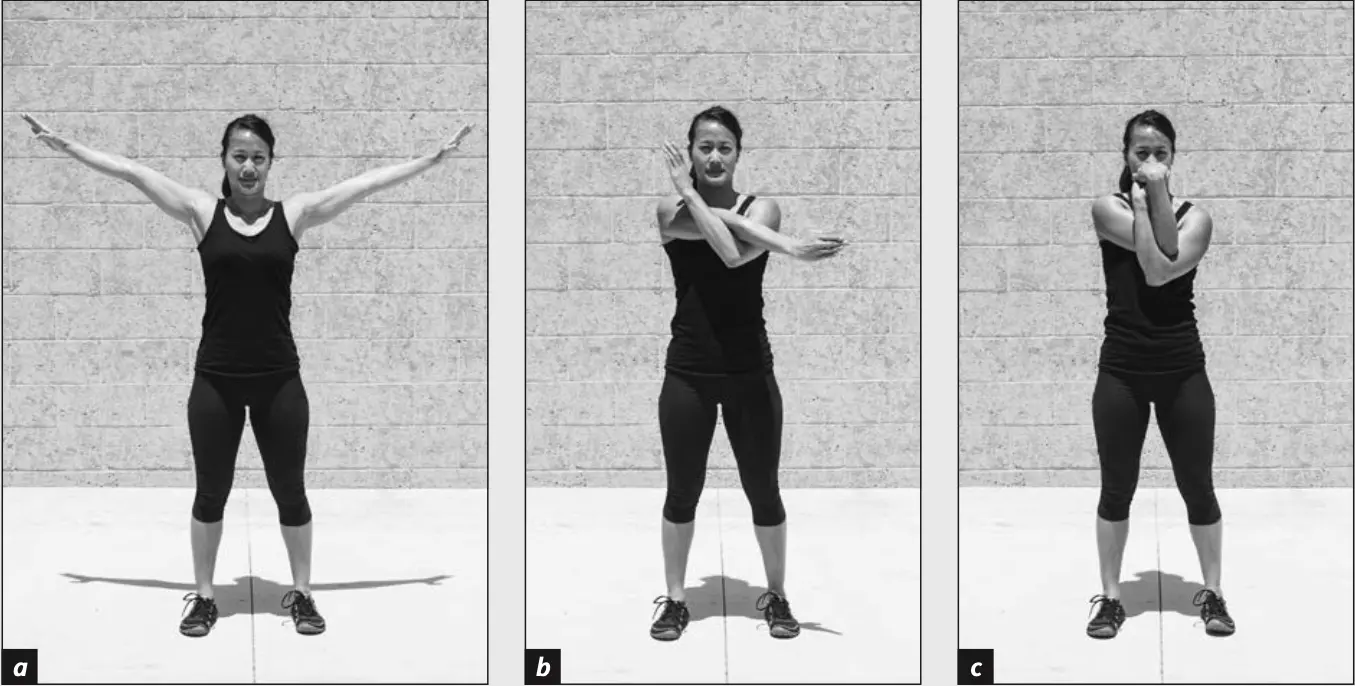
Figure 6.18 Yoga Eagle Stretch.
From a standing or seated position, reach both arms out to the sides (see figure 6.18a) and then cross one arm over the other in front of you (see figure 6.18b). Fold both elbows in toward your body. If crossing the left arm on top, the right hand will reach up and grab the left wrist or palm (see figure 6.18c). Point your left thumb directly toward your forehead. Hold this position for 30 seconds and then repeat on the other side.
To progress further, assume the eagle stretch position as just described. Keep your palms firmly pressed together and either push both elbows down toward your hips or lift both arms up.
Single Press
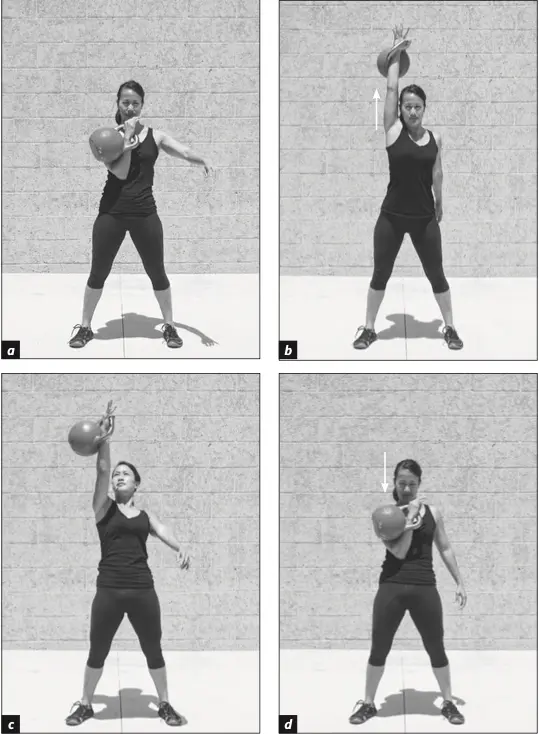
Figure 6.19 Single press.
The single press is a total upper-body movement that is the beginning progression for more advanced overhead exercises. It teaches proper alignment in the overhead position while simultaneously conditioning the arms, shoulders, and back — and it is the foundational lift for vertical pushing or pressing movements.
How to Perform
Clean a single kettlebell to your chest into the rack position (see figure 6.19a) — this is the start position for the press. Before pressing up, compress your rib cage on the side of the pressing arm. As you recoil to the downward compression, press the kettlebell directly up until your elbow is completely extended in the lockout position (see figure 6.19b).
In the overhead position, the optimal position of the hand and shoulder is such that your thumb is pointing directly back. A slight rotation of the palm is acceptable, but avoid overrotating so that you have the most efficient path — a straight line. Any additional rotation or deviation from the straight line is wasted effort and nonoptimal alignment.
The Drop
To lower the kettlebell, move your body back slightly so that the kettlebell can fall directly down the centerline all the way to the hip (see figure 6.19c) and back to the rack position to complete the lift (see figure 6.19d). The drop from the overhead lockout position back to rack should be a smooth, relaxed movement.
Breathing
Use anatomical breathing with four breathing cycles. Starting from the rack position:
- Inhale deeply before the initial compression, then exhale as you drop or flex your thoracic spine.
- Inhale as you bump with the rib cage, exhale as you lock out.
- Take one full breath cycle in lockout and add more recovery breaths if needed.
- Inhale as you begin to drop the kettlebell, exhale as it lands back in the rack position.
Key Principles
- The rack is important in creating a virtual bench — a position of both rest and power generation, ensuring connectivity between the arm and the torso so there is a solid power transfer.
- Use the whole body to press, not just the shoulders. Due to the influence of bodybuilding, many people think the correct way to press is via isolating the deltoid muscles. Kettlebell training focuses on movement efficiency instead of isolation, distributing the work among multiple movers. Create an initial compression, then a bumping action of the spine, to add power and work capacity. Imagine your rib cage as an accordion that opens and closes as you press up and drop down.
Push Press
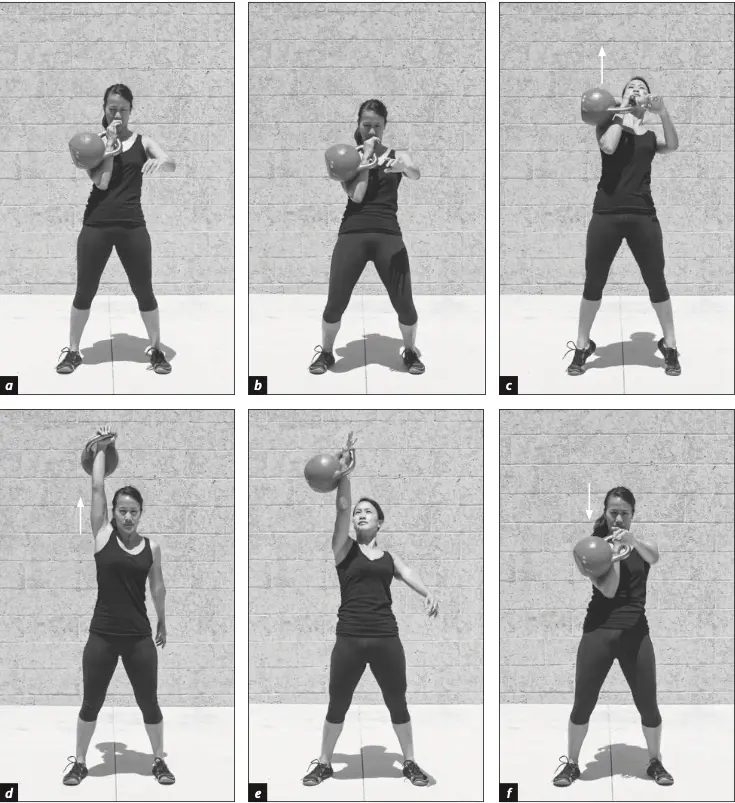
Figure 6.20 Push Press.
The push press is identical to the press but includes a leg drive. The lift initiates from the legs and is completed through the arm and hand. This allows more diversified conditioning and significantly increases the ability to work at higher volume and intensity.
How to Perform
Clean the kettlebell to your chest (see figure 6.20a). Load the stance by sinking your knees downward as you compress your rib cage (see figure 6.20b). Immediately follow the slight downward knee bend with fast and explosive lifting, pressing your feet vigorously into the ground (see figure 6.20c).
From the extension of the legs, the kettlebell will already be more than halfway to the top. Complete the lift by pressing through the triceps into the overhead lockout position — identical to the top position of the press (see figure 6.20d).
To drop the kettlebell back to your chest, rise up slightly on your toes as you move your body back to allow the kettlebell to fall straight down the chimney (see figure 6.20e). Your feet are planted again as the kettlebell reaches your chest and your elbow slides on top of your hip (see figure 6.20f).
Breathing
Use anatomical breathing with four breathing cycles. Starting from the rack position:
- Inhale deeply before the initial compression, exhale as you drop into a half squat.
- Inhale as you extend the legs and bump with the rib cage, exhale as you lock out.
- Take one full breath cycle in lockout and add more recovery breaths if needed.
- Inhale as you deflect the trunk backward to drop the kettlebell, exhale as the kettlebell lands back in the rack position.
Key Principles
- During the half squat, stay connected with the heels flat on the ground and the elbows and forearms pressed against the torso. The connectivity keeps the body linked and improves the transfer of energy from the ground up.
- Use the whole body in the push press — following a rapid half squat, create an initial compression and then a rapid extension into the bumping action of the spine, with the arm finishing the lift.
Snatch
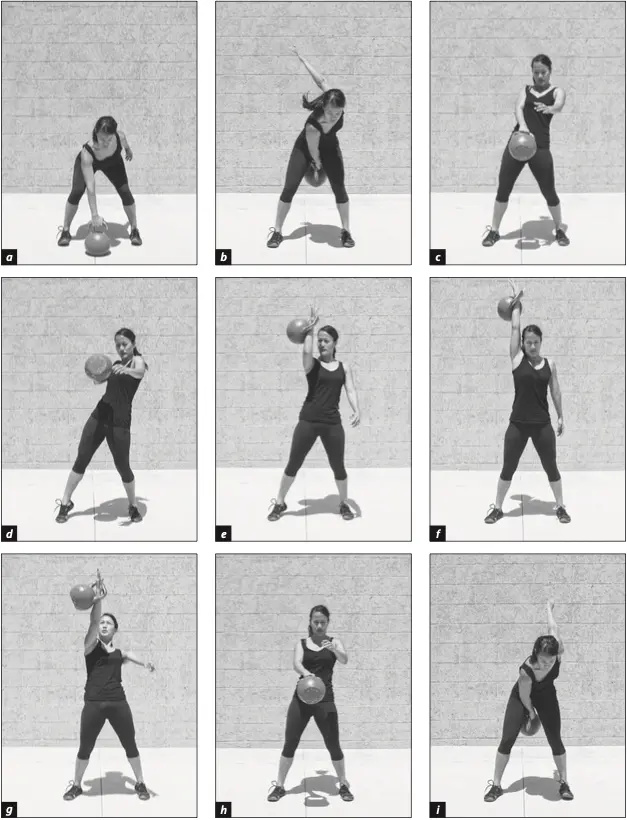
Figure 6.21 Snatch.
The kettlebell snatch is a total-body exercise with special emphasis on the entire posterior chain. It simultaneously develops strength, explosiveness, structural integrity, cardiorespiratory capacity, and virtually every attribute on the athletic continuum.
The Six Stages of the Snatch
Inertia swing
Loading the hips with backswing momentum.
Acceleration pull with hip and trapezius
The explosive vertical drive.
Hand insertion deep into the handle
Letting the kettlebell rotate around the wrist.
Overhead lockout
Fully extended elbow, thumb pointing back.
Direction change into the drop
Shifting weight and beginning the descent.
Grip change into the backswing
Reverting from hand-insertion to finger grip.
How to Perform
With the kettlebell on the floor in front of you, load your hips and grip the kettlebell with your fingers as you would for the swing (see figure 6.21a). Swing the kettlebell back between your legs as you begin to stand, further loading the hips (see figure 6.21b).
As with the swing and clean, various thumb positions can be used in the downswing and upswing portion of the snatch. The most common is to rotate the thumb back at the end of the downswing and transition to a 45-degree angle (thumb up) at the beginning of the acceleration pull.
Keep your arm connected to your body and extend your knees and hips, allowing the inertia of the kettlebell to pull your arm forward (figure 6.21c). Just as the arm begins to separate from the body, accelerate the kettlebell vertically as fast as you can by rapidly pulling with the hip, followed by a shrug of the trapezius.
If you are snatching with your right hand: push forcefully with your left leg, pull back your right hip, and shrug with your right trap (see figure 6.21d). As the kettlebell accelerates upward, release your fingers and insert your palm deeply into the handle (see figure 6.21e). Allow the momentum to carry the kettlebell all the way to the top and lock out your arm in the fully extended elbow position (see figure 6.21f). The overhead lockout is identical to the press or push press — thumb facing back, no or minimal rotation.
The Drop
To drop the kettlebell back down, first shift your weight to the opposite foot (if snatching with the right hand, shift to the left foot) and lean your upper body back (see figure 6.21g). Keep your hips and torso extended maximally and let your triceps connect to your torso. Finish the downswing by changing grips and pulling your hand back to catch the handle with your fingers (see figure 6.21h), and tighten the fingers as you follow the kettlebell between your legs into the backswing (see figure 6.21i). Use the rhythmic motion to continue the snatch for the desired repetitions.
Breathing
Use anatomical breathing with three or more breathing cycles. From the overhead position:
- Three-cycle variation — inhale as you deflect back and drop the kettlebell into the downswing, exhale at the back of the downswing, inhale as you upswing, exhale on lockout.
- More cycles — inhale as you deflect back and drop the kettlebell, exhale into the downswing, inhale, exhale as you begin the acceleration pull, inhale, exhale on lockout.
For both variations, you can take recovery breaths in the overhead position.
Key Principles
- Ensure a connection between the torso and arm on the upswing for maximal leverage and power transfer. Having your full body mass behind the acceleration of the kettlebell will enable you to move the kettlebell faster and therefore with more power and ease.
- Hand insertion should occur when the kettlebell is higher than head level, and before your elbow fully extends. Inserting too early or too late interferes with smooth timing and force transfer.
- Overhead alignment and the position of the kettlebell on the hand is an important factor in work capacity, grip endurance, and injury avoidance. Finding the position that allows you to relax makes managing the breath easier — an incorrect position creates excessive tension and brings fatigue sooner.
- As with the swing and clean, maintain deflection when dropping the kettlebell from the overhead position into the backswing. This is necessary for proper balancing, safety, and load distribution. Do not crease the hips until the triceps comes into contact with the rib cage.
- Time the torso and hip creasing with the moment your triceps touches the rib cage, allowing you to absorb a greater percentage of the decelerating load through the strong muscles of the legs and torso.
You are most likely inserting your hand too early, too late, or at an incorrect angle. Use a hand-insertion drill where you visualize a ladder with four rungs in front of you on the vertical plane:
- Rung 1 — chest level
- Rung 2 — face level
- Rung 3 — just over your head
- Rung 4 — near the top, just before your arm reaches full extension
Clean up and release the fingers to insert the hand at each level, then drop down into backswing between each insertion. This will give you the feel of perfect timing — at the rung 3 to rung 4 level.
Squat
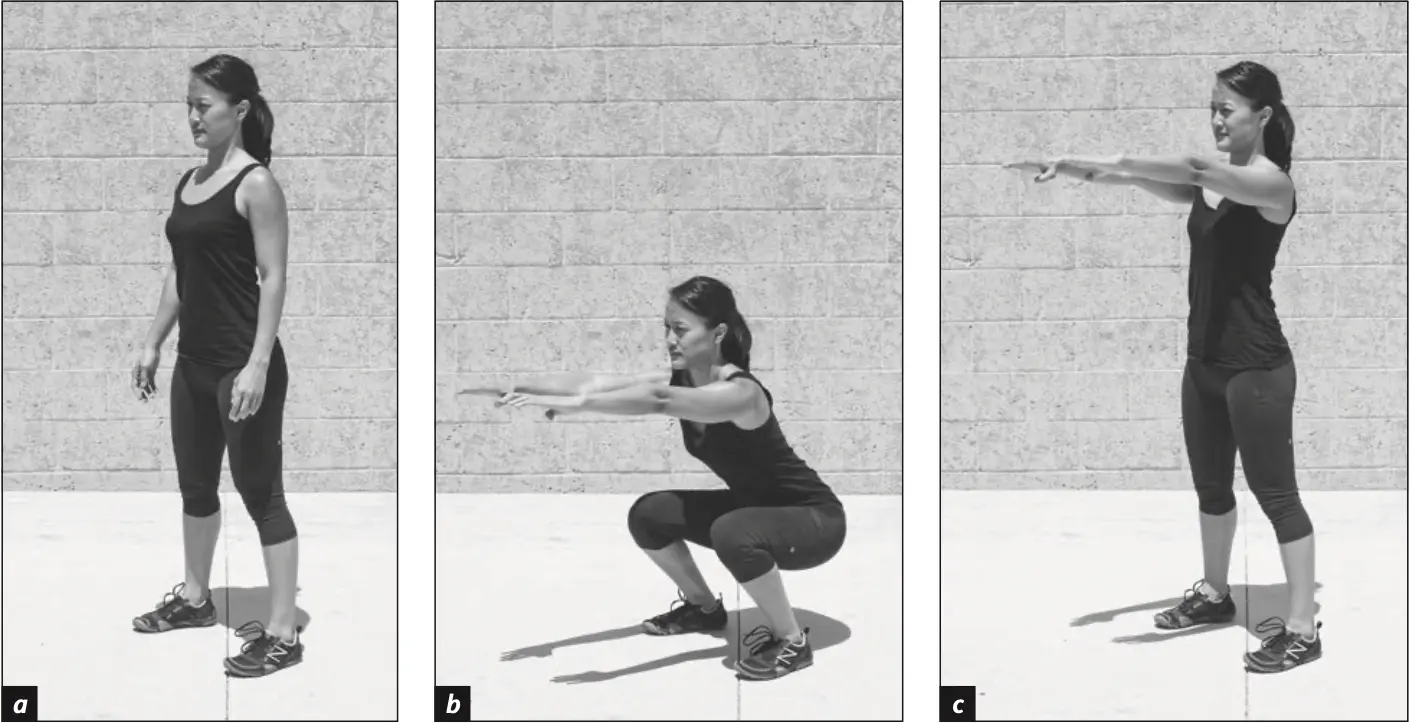
Figure 6.22 Squat.
The squat is a primal movement pattern and one of the most important strength and conditioning exercises for all-around good function and health. Watch a young child and you'll see that she can squat with perfect mechanics without any instruction at all.
Goals for a Quality Squat
Feet Flat on the Ground
Knees Aligned Vertically Over the Feet
Hips Sit Back
Trunk Upright
Balanced and Stable
How to Perform
Stand with your feet about shoulder-width apart with the toes pointing forward (see figure 6.22a). In some cases, tightness in the hip joints will require that the toes are turned out to the sides. If this applies to you, it's OK to do so up to about 30 degrees.
Sit back by leading with the hips as if you were sitting on a chair or box (review the box squat in the Introductory Kettlebell Moves section earlier in this chapter). Actively descend into the bottom position by pulling yourself down with your hip flexors as you drop your center of mass until the tops of your thighs are parallel with the floor or slightly below parallel (see figure 6.22b). Open the hips to achieve maximal depth.
Try to avoid flexing your trunk forward too much. Pushing your arms out in front of you serves as a counterbalance to help you sit back with the trunk. Throughout the movement, your feet stay flat on the floor.
From the bottom position, push your feet firmly into the floor and extend straight up, straightening the legs fully (see figure 6.22c). Once you have the feel of this movement, and if you have no pain or discomfort, you can begin loading. Paradoxical or anatomical breathing can be used depending on weight and volume.
Loaded Squat Progression
Progressing in the squat is best done in stages.
Stage 1 — Goblet Squat
Hold a single kettlebell with both hands facing palms up and forearms against your body (see figure 6.23a). The shape of the hands looks like a goblet or giant drinking glass. Squat down (see figure 6.23b) and stand up while holding the kettlebell in front of you (figure 6.23c).
Many people find that the front-loaded position acts as a counterbalance, enabling you to sit further back.
Stage 2 — Front Squat
Clean one kettlebell to the rack position (see figure 6.24a). Keep the arm against the body as you squat down (see figure 6.24b) and stand up. Your nonloaded hand will be out to the side acting as a counterbalance.
Stage 3 — Double Front Squat
In the next chapter you will learn the front squat with double kettlebells.
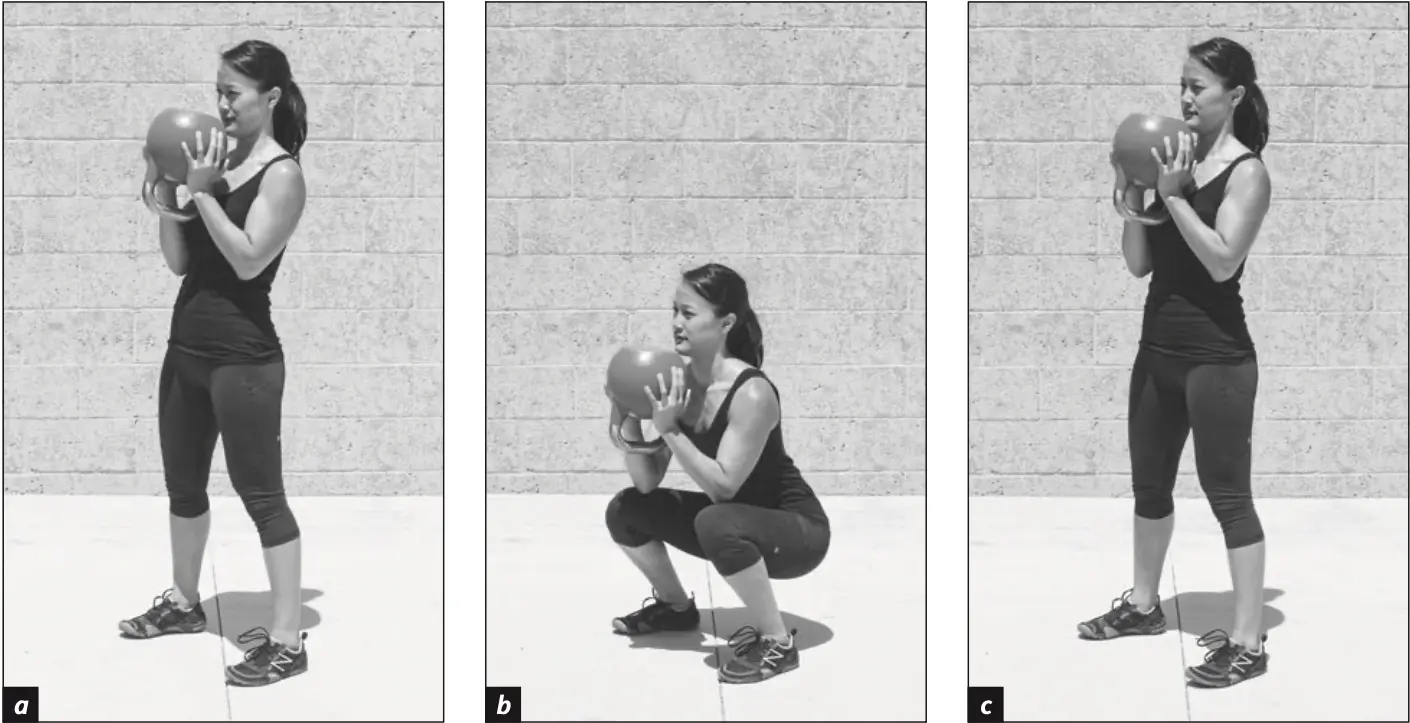
Figure 6.23 Goblet Squat.
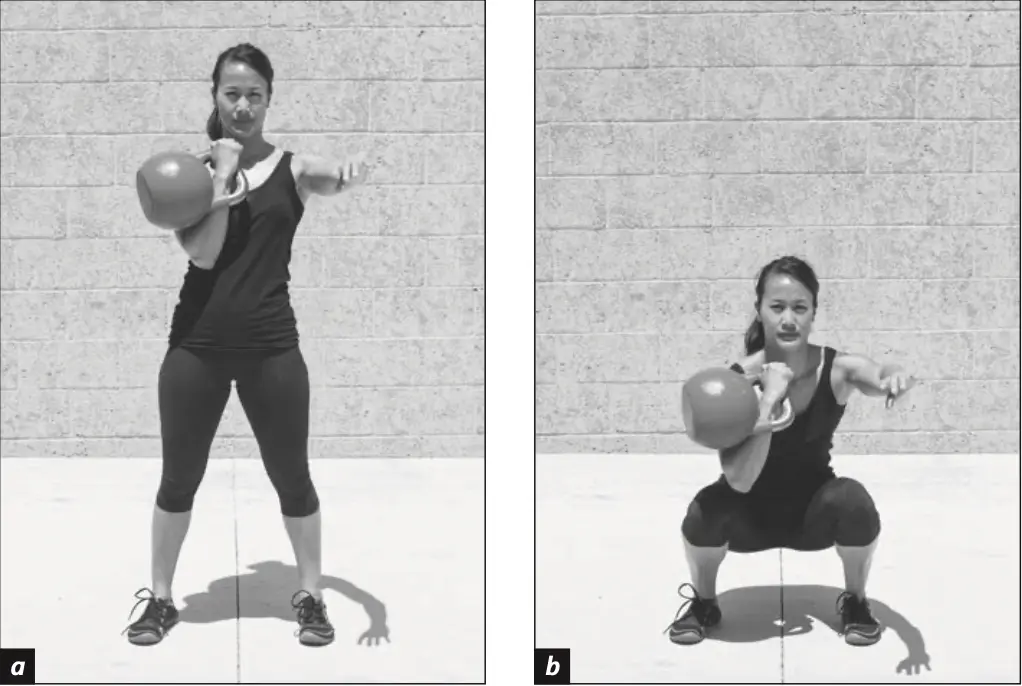
Figure 6.24 Front Squat.
Key Principles
- Initiate the movement in the hips, not in the knees.
- The trunk remains as upright as possible throughout.
- Aim for maximal range of motion at the top and bottom positions of the squat.
Stand with the tips of your toes touching the wall. Looking straight ahead, pull your arms behind you by pinching your shoulder blades together. Sit back and down into the squat, and then stand up. The wall will prevent you from moving forward, so you have to sit back and keep an arch in the spine.
Initially you may need to move your toes away from the wall a bit. As you improve, you can move the toes closer.
Insert a small weight plate or block 2 to 4 in. (5–10 cm) tall under the heels to enable you to sit down further. Progress to using a shorter lift, and eventually you'll be able to squat with none.
Perform an ankle mobility exercise as a warm-up and between sets: in an extended lunge position, kneel on one knee on a mat with the other foot in front; palms are flat on the floor about shoulder-width apart in front of the front foot. Shift weight to the hands and lift the rear knee. Point the toes of the rear foot into maximal plantar flexion while firmly pressing the ankle into the floor. Press your shoelaces into the floor to feel the stretch along the front of your ankle, foot, and shin. Immediately change to maximal dorsiflexion by pushing firmly back with the hands and front foot, driving the rear heel into the floor. Alternate between laces down and heel back.
Building Your Foundation
Kettlebell Lifting Technique
Master the three foundations of kettlebell technique — grip, chalking, and breathing patterns for productive training.
Intermediate Exercises
Single-arm and double-kettlebell variations and complex full-body movements that build on the basic lifts: single-leg deadlift, double swing, double clean, jerk, windmill, get-up, and more.